To resize an image on an iPhone, open the Photos app, select the image, tap “Edit,” then choose the crop tool. Adjust the image’s size by dragging the corners and hit “Done” to save changes.
Resizing images on an iPhone can be a quick task for those wanting to adjust their photos for social media, printing, or personal use. The process is built into the iPhone’s native Photos app, making it accessible without the need for additional software.
With the increasing use of visual content online, understanding how to manipulate image dimensions is a useful skill. This guide provides a straightforward method for anyone looking to customize their images directly from their device. The iPhone’s user-friendly interface ensures that even beginners can perform this task with ease, keeping their digital content looking sharp and professional.
Introduction To Image Resizing On Iphone
Resizing images on an iPhone is simple and efficient. Whether you need to adjust a photo for social media or manage storage space, the iPhone offers easy tools to change image size directly from your device.
Why Resize Images?
- Save space on your device.
- Make images fit specific requirements for social media or email.
- Speed up website loading times with smaller images.
Tools You Need
The iPhone comes equipped with all the tools you need to resize images:
- Photos app – Built-in app for easy access.
- Third-party apps – Additional features available.
Credit: www.businessinsider.com
Accessing Your Photos
Accessing your photos on an iPhone is the first step to resizing them. This process is quick and user-friendly. Let’s explore how to navigate the Photos app and select the image you want to resize.
Navigating The Photos App
Opening the Photos app is where your image resizing journey begins. The app icon looks like a multi-colored flower. Tap it to start.
- Tap the Photos app on your iPhone’s home screen.
- Scroll through your photo library or albums to find your pictures.
- Use the Search feature to find a specific photo quickly.
Once the app is open, you will see different views: Years, Months, Days, and All Photos. Choose the one that best helps you find your image.
Selecting The Image To Resize
After finding the right photo, the next step is to select it for resizing.
- Touch and hold the photo you wish to resize.
- Release to open the photo in full-screen.
- Tap the photo once to reveal options at the screen bottom.
With the image selected, you’re ready to adjust its size. The Photos app does not directly resize, but other methods are available. Keep following along to learn how.
Using Built-in Editing Features
Editing images directly on an iPhone is simple. The built-in editing features let you resize photos fast. No need for extra apps. Let’s dive into how to use these tools effectively.
Cropping For Quick Resizing
Open your photo and select ‘Edit’ in the top right corner. Use the corners to drag and crop your image. This method is perfect for trimming unwanted edges, focusing on a subject, or changing the composition.
- Tap ‘Edit’ on your photo
- Choose the crop tool at the bottom
- Drag the corners to resize
- Hit ‘Done’ to save changes
Aspect Ratio Adjustments
Maintaining an aspect ratio is key for platforms like Instagram or Facebook. Your iPhone makes it easy to adjust without distorting the image.
- Open the crop tool in your photo editor
- Tap the aspect ratio button on the top right
- Select a ratio like 16:9 or 1:1
- Move the photo within the frame to fit
- Press ‘Done’ to save your resized photo
Remember to save a copy if you wish to keep the original size. These simple steps ensure your images are perfect for sharing!
Third-party Apps For More Options
For iPhone users seeking advanced image resizing options, third-party apps are a treasure trove. They offer diverse features beyond the basics. Let’s explore the top apps and tips for a smooth experience.
Top App Recommendations
- Image Size – This app allows precise measurements and easy export options.
- Photo Resizer – Simple interface with quick resizing and editing tools.
- Resize for Story – Perfect for social media enthusiasts needing story-specific dimensions.
Download And Installation Tips
- Check app reviews and ratings before downloading.
- Ensure sufficient space on your iPhone to avoid installation issues.
- Follow on-screen instructions carefully during installation.
- Allow necessary permissions for the app to function properly.
Step-by-step Guide To Resizing With An App
Ready to share photos at the perfect size? iPhones make it easy with a variety of apps. This guide shows you how to resize images quickly and accurately. Let’s dive into the process.
Importing Your Photo
Start by selecting the right app. Open the app and tap ‘Import’ or ‘Gallery.’ Choose the photo you wish to resize. It will now appear ready for editing.
Customizing Dimensions
After importing, it’s time to adjust. Here’s how:
- Access the resize tool within the app.
- Enter your desired dimensions manually, or select a preset size.
- Check the preview to ensure your photo looks great.
- Save or export the newly sized image to your iPhone.
Credit: gooddogstrategies.com
Saving And Sharing Your Resized Images
Resizing images on your iPhone is a breeze, and sharing them should be just as simple. Once you have your image at the perfect size, you’ll want to save and share it with friends, family, or on social media. Let’s dive into how you can do that efficiently.
Exporting Options
Your iPhone gives you several ways to save and send your resized images.
- Save to Files: Keep a copy in iCloud Drive or on your device.
- Save to Photos: Add the image directly to your photo library.
- Use Share Sheet: Send via AirDrop, Messages, Mail, or social apps.
Choose the best option to fit your needs.
Image Quality Considerations
Quality matters when you save and share images.
| Format | Quality | Size |
|---|---|---|
| JPEG | High | Smaller |
| PNG | Higher | Larger |
| HEIF | Highest | Smallest |
Pick the right format to balance quality and file size.
Advanced Techniques
Advanced Techniques for resizing images on an iPhone can save time and streamline your photo management process. Whether you’re a professional photographer or someone who loves to share photos on social media, these tips will elevate your photo editing skills.
Batch Resizing Multiple Photos
Resizing photos one by one can be tedious. iPhones have a hidden power to resize multiple images with ease. This is ideal for quickly sharing photos online or saving storage space.
- Select your desired photos in the Photos app.
- Tap on the share icon and choose ‘Print’.
- Use a pinch-out gesture on a photo preview to turn it into a PDF.
- Save the PDF to Files and use a third-party app to extract and resize images.
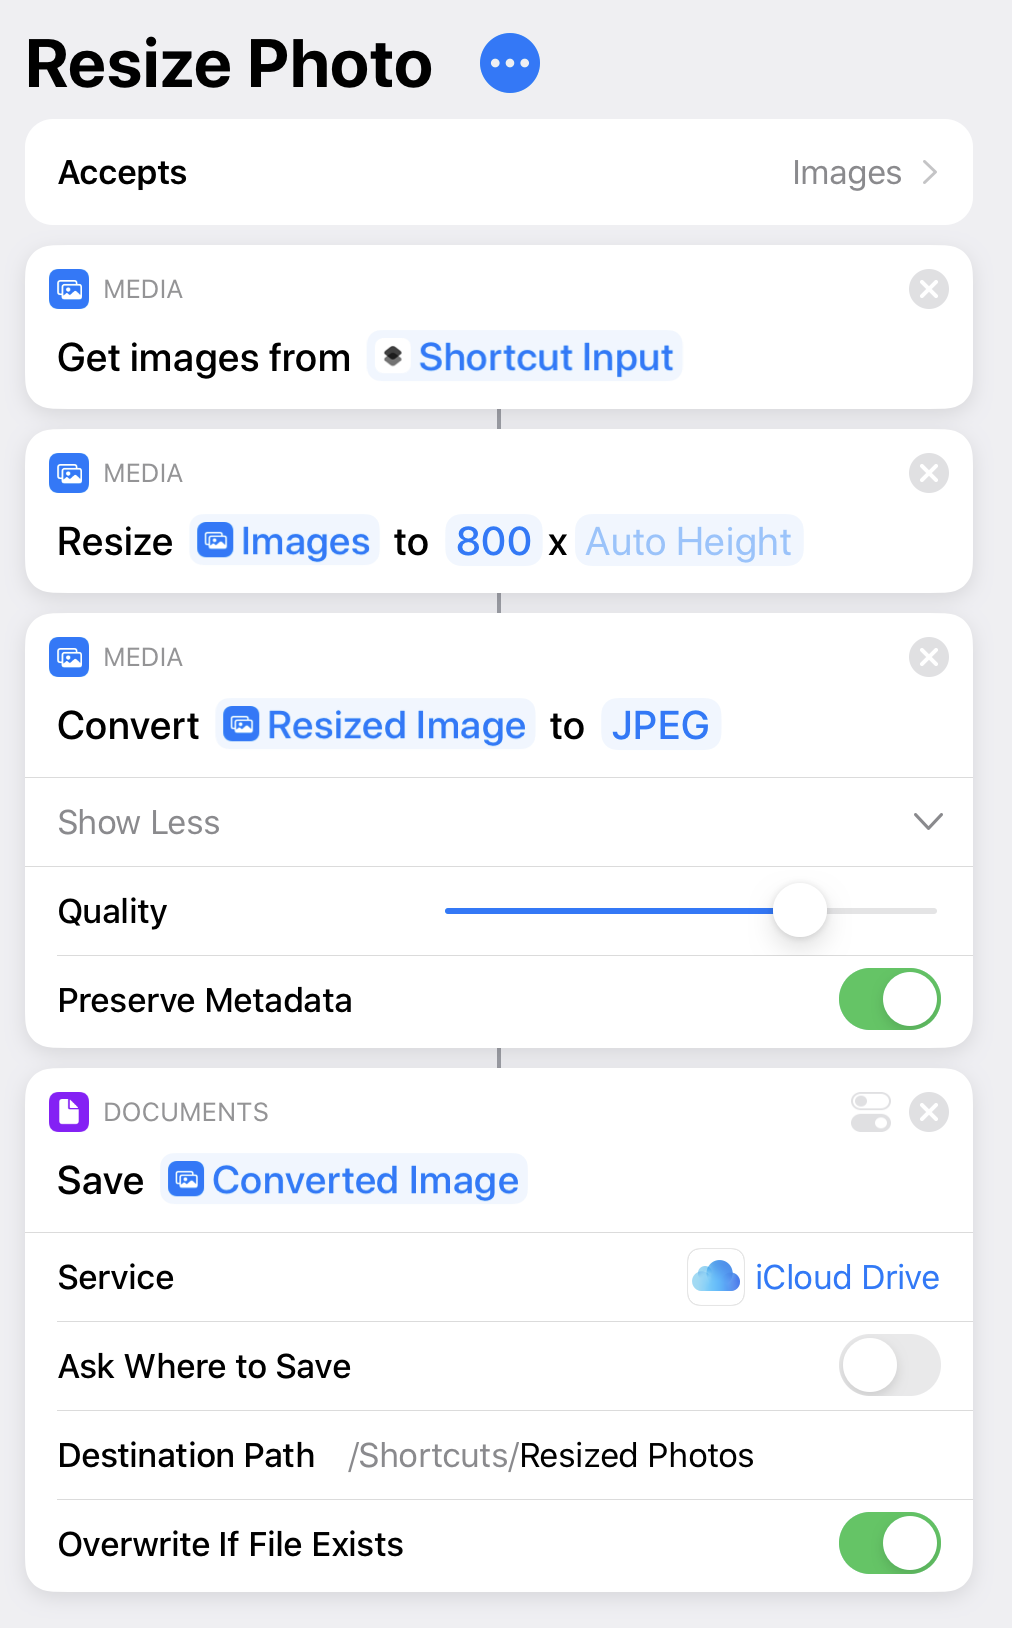
Using Shortcuts For Automation
The Shortcuts app on your iPhone allows for incredible automation. You can create or download a shortcut to resize images in a flash.
- Open the Shortcuts app and tap on ‘Create Shortcut’.
- Add actions to resize images to your preferred dimensions.
- Save the shortcut and add it to your Home Screen for quick access.
- Select photos, run the shortcut, and get resized images instantly.
Tip: Explore the Shortcuts Gallery for pre-made image resizing shortcuts created by the community.
Common Pitfalls To Avoid
Many iPhone users love sharing photos but resizing images can be tricky. Let’s discuss common pitfalls to avoid during this process. This ensures every photo looks its best.
Preserving Image Quality
When resizing an image, quality can suffer. Avoid these mistakes:
- Don’t over-compress: High compression reduces file size but harms image clarity.
- Choose correct tools: Use trusted apps that maintain quality during resizing.
- Back up originals: Always keep a copy of the original photo before making changes.
Aspect Ratio Mistakes
Getting the aspect ratio right is crucial. Wrong ratios can stretch or squash photos. Here’s how to avoid errors:
- Know standard ratios: Familiarize yourself with common aspect ratios like 4:3 or 16:9.
- Lock the aspect ratio: Use iPhone features to lock the ratio and prevent distortion.
- Use guides: Apps often provide grid lines. They help maintain proportions while cropping.
Credit: www.businessinsider.com
Frequently Asked Questions
Can You Resize A Photo On An Iphone?
Yes, you can resize a photo on an iPhone using the built-in Photos app or third-party apps available from the App Store.
How Do I Resize An Image In Photos?
To resize an image in Photos, open the app and select your image. Click on the “Edit” button, then choose the “Crop” tool. Here, you can adjust the image size by dragging the corners. Save your changes once done.
How Do You Reduce The Mb Size Of A Photo?
To reduce the MB size of a photo, use an image compressor tool online. Alternatively, adjust the resolution and format settings in an image editing software. This can significantly decrease the file size without losing quality.
How To Use Resize Image Shortcut On Iphone?
To resize an image on iPhone, open the Photos app, select the image, tap “Edit,” then choose the “Crop” tool to adjust size. Save your changes.
Conclusion
Resizing images on your iPhone is a breeze with the right tools and techniques. Whether you’re adjusting for social media or personal use, the steps outlined in this guide ensure quick, hassle-free editing. Embrace these simple methods to refine your photos, enhancing their impact and suitability for any digital space.
Ready, set, resize!
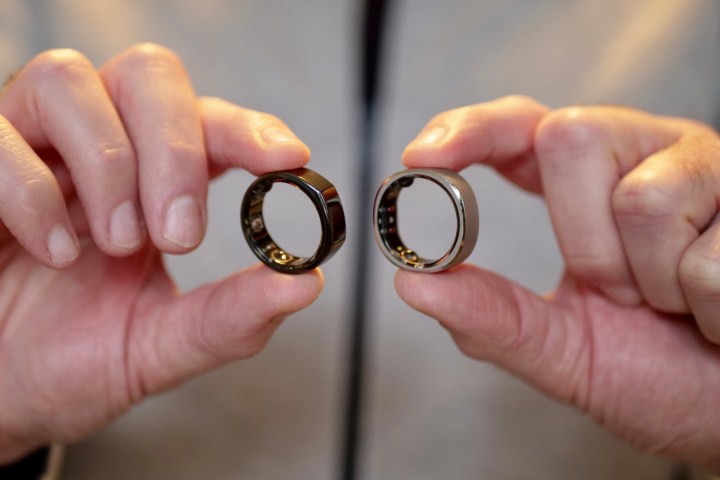
I ditched my Apple Watch for the Oura Ring due to its superior sleep tracking and minimalist design. The ring offers more accurate health insights.
The Oura Ring has gained popularity for its advanced health monitoring capabilities. Unlike the Apple Watch, the Oura Ring focuses on sleep and recovery metrics. It provides detailed insights into sleep quality, readiness, and overall health. The minimalist design and long battery life make it convenient to wear day and night.
Users appreciate the comfort and ease of use compared to bulky smartwatches. The Oura Ring also integrates seamlessly with health apps, making it a versatile tool for wellness tracking. This shift to Oura Ring addresses both functionality and style, offering a more streamlined approach to health monitoring.
Credit: www.digitaltrends.com
The Dawn Of Wearable Technology
Wearable technology has transformed how we monitor our health and fitness. Devices like smartwatches and fitness trackers have become part of our daily lives. These gadgets now do more than just tell time. They help us understand our bodies better.
From Novelty To Necessity
Wearables started as fun gadgets. They were interesting but not essential. People bought them out of curiosity. Soon, they became more than just toys. They started tracking our steps, sleep, and heart rate. This data became valuable.
Today, wearables are necessary for many. They help us stay fit and healthy. They remind us to move, sleep well, and manage stress. These devices are now a part of our daily routines.
The Rise Of Health-focused Gadgets
The market is now full of health-focused gadgets. These devices track more than just physical activity. They monitor our overall well-being. The Apple Watch and the Oura Ring are two popular choices.
Apple Watch: Tracks fitness, sends notifications, and even makes calls. It’s a mini-computer on your wrist.
Oura Ring: Focuses on sleep, recovery, and readiness. It’s a small ring worn on your finger.
Both have their strengths. The Apple Watch is versatile. The Oura Ring is specialized. I switched to the Oura Ring for its health focus. It provides deep insights into my sleep and recovery. This helps me feel better daily.
| Feature | Apple Watch | Oura Ring |
|---|---|---|
| Fitness Tracking | Yes | No |
| Sleep Tracking | Basic | Advanced |
| Notifications | Yes | No |
| Battery Life | 1-2 days | 5-7 days |
Wearables are evolving. They are becoming smarter and more focused. Choosing the right one depends on your needs. For me, the Oura Ring offers the health insights I value the most.
Initial Attraction To The Apple Watch
The Apple Watch is a popular wearable device. It promises many features. These features attract many users. I was one of them. The Apple Watch seemed perfect at first. It had everything I thought I needed. But why did I eventually switch to the Oura Ring? Let’s start with why I was drawn to the Apple Watch initially.
The Allure Of Comprehensive Features
The Apple Watch offers a range of features. It tracks steps, heart rate, and sleep. It also has fitness tracking and notifications. These features make it a powerful tool. It seemed like the perfect device for my needs.
Here are some key features that attracted me:
- Health Monitoring: Tracks heart rate, ECG, and blood oxygen levels.
- Fitness Tracking: Monitors workouts, steps, and calories burned.
- Notifications: Receives calls, messages, and app alerts.
- Music Control: Allows control of music playback.
- GPS: Provides accurate location tracking.
Integration With The Apple Ecosystem
The Apple Watch integrates seamlessly with other Apple devices. This was a big attraction for me. I use an iPhone, iPad, and MacBook. The Apple Watch fits perfectly into this setup.
Here are some integration benefits:
- Seamless Syncing: Syncs easily with iPhone, iPad, and MacBook.
- Continuity Features: Handoff, Continuity Camera, and Universal Clipboard.
- Apple Pay: Easy and secure payments from the wrist.
- Find My: Locate your devices quickly.
- Apple Health: All health data in one place.
This integration made the Apple Watch very appealing. It promised to make my life easier.
The Apple Watch Experience
The Apple Watch is a popular gadget. It offers many features. But, my experience wasn’t perfect. Here’s why I switched to the Oura Ring.
Daily Interactions And Notifications
Every day, the Apple Watch buzzes with alerts. It shows messages, calls, and reminders. This constant buzzing can be distracting. I often felt overwhelmed.
Also, replying to messages on the small screen was hard. Typing on it took a lot of time. The tiny screen made it tough to read long messages. This wasn’t very user-friendly.
Another issue was battery life. Charging the Apple Watch daily became a chore. I wanted a device that could last longer.
Health And Fitness Tracking Capabilities
The Apple Watch tracks many health metrics. It counts steps, monitors heart rate, and tracks workouts. But, I found some features lacking.
The sleep tracking was basic. It did not give deep insights. I wanted more detailed sleep data. The Apple Watch didn’t provide it.
Also, its bulky design wasn’t comfortable for all-day wear. Wearing it while sleeping felt awkward. The large size was inconvenient during workouts.
Here’s a quick comparison of key features:
| Feature | Apple Watch | Oura Ring |
|---|---|---|
| Notifications | Frequent and distracting | Minimal and non-intrusive |
| Battery Life | 1 day | Up to 7 days |
| Sleep Tracking | Basic | Detailed insights |
| Comfort | Bulky | Light and sleek |
Encountering The Oura Ring
I have always been a tech enthusiast. I love trying new gadgets. For years, the Apple Watch was my go-to. But something made me curious about the Oura Ring. It promises a lot in a small package. Here’s what happened after I encountered it.
First Impressions
The Oura Ring arrived in a sleek box. I was excited to open it. The first thing I noticed was its size. It’s small and light. It fits comfortably on my finger. Unlike the Apple Watch, it doesn’t feel bulky. The ring is made of durable materials. It looks elegant and modern.
| Feature | Oura Ring | Apple Watch |
|---|---|---|
| Size | Small and light | Bulky |
| Comfort | Fits comfortably | Can feel heavy |
Core Features Of The Oura Ring
The Oura Ring packs many features. It tracks sleep, activity, and readiness. It measures heart rate and body temperature. Its battery lasts up to seven days. The data syncs effortlessly with the app. The insights are easy to understand.
- Sleep Tracking: Monitors deep, light, and REM sleep.
- Activity Tracking: Counts steps, calories burned, and activity levels.
- Readiness Score: Tells you how ready you are for the day.
- Heart Rate: Measures resting heart rate and variability.
- Body Temperature: Tracks changes in body temperature.
The Oura Ring is powerful. It gives detailed health insights. I was impressed by its accuracy. The data it provides is actionable. I can make better health choices now.
Switching from an Apple Watch to the Oura Ring was a big change. The Oura Ring is small but mighty. It fits seamlessly into my life. It offers the health tracking I need without the bulk.
Comparing Form Factors
Choosing between the Apple Watch and the Oura Ring involves comparing form factors. This section highlights comfort, convenience, and style differences.
Wristwatch Vs. Ring: Comfort And Convenience
Wearing an Apple Watch on your wrist can feel bulky. The strap might irritate your skin, especially during intense activities. In contrast, the Oura Ring is lightweight and fits snugly on your finger. You barely notice it, even while sleeping.
Comfort is crucial for all-day wear. The Apple Watch needs charging every day, which can be inconvenient. The Oura Ring, on the other hand, offers a longer battery life, often lasting several days on a single charge.
Convenience also involves ease of use. A ring is easier to put on and take off. The Apple Watch requires you to navigate its screen, while the Oura Ring syncs data automatically to your phone.
| Feature | Apple Watch | Oura Ring |
|---|---|---|
| Weight | Heavy | Light |
| Battery Life | 1 day | 5-7 days |
| Skin Irritation | Possible | Rare |
Style And Personal Expression
Style plays a huge role in your choice. The Apple Watch has a techy look, which may not fit all outfits. The Oura Ring, however, blends seamlessly with any style. It looks like a regular ring, making it a subtle accessory.
Personal expression matters. The Apple Watch offers customizable bands and watch faces. But it still looks like a smartwatch. The Oura Ring offers a range of colors and finishes. You can choose from silver, black, and more.
For those who value subtle elegance, the Oura Ring wins. It doesn’t scream “tech gadget” and suits both formal and casual attire.
- Apple Watch: Techy appearance, customizable bands.
- Oura Ring: Elegant design, multiple finishes.

Credit: www.iphonelife.com
Battery Life And Charging Routines
Switching from the Apple Watch to the Oura Ring wasn’t a light decision. One major factor was Battery Life and Charging Routines. Here’s why the Oura Ring won in this department.
The Hassle Of Daily Charging
Charging my Apple Watch every day became tiring. I’d forget to charge it often. This meant my watch would die during important moments. The daily charging routine was a hassle.
Here’s a quick breakdown of my Apple Watch charging routine:
| Task | Time Required |
|---|---|
| Charging | 1-2 hours daily |
| Finding the charger | 5 minutes daily |
| Setting reminders | 5 minutes daily |
Overall, I spent about 2 hours daily on charging routines.
The Advantage Of Longer Battery Life
The Oura Ring offers a longer battery life. It lasts up to 7 days on a single charge. This longer battery life is a game-changer.
- No daily charging required.
- More time to focus on other tasks.
- Less stress about battery life.
Here’s my new Oura Ring charging routine:
| Task | Time Required |
|---|---|
| Charging | 1 hour weekly |
| Finding the charger | 5 minutes weekly |
| Setting reminders | 1 minute weekly |
Now, I spend only about 1 hour weekly on charging routines.
Switching to the Oura Ring simplified my life. The long battery life made it more reliable. My days are now more focused and productive.
Focusing On Sleep And Recovery
Switching from the Apple Watch to the Oura Ring was a big change. My main goal was to improve my sleep and recovery. The Oura Ring excels in these areas. It provides detailed insights that helped me understand my body better.
In-depth Sleep Analysis
The Oura Ring offers in-depth sleep analysis. It tracks various stages of sleep, including light, deep, and REM sleep. This information is crucial for anyone wanting to improve their sleep quality.
| Sleep Stage | Duration | Importance |
|---|---|---|
| Light Sleep | 50-60% | Basic body functions |
| Deep Sleep | 10-20% | Physical recovery |
| REM Sleep | 20-25% | Mental recovery |
With this data, I identified patterns and made adjustments. I focused on improving my deep and REM sleep. This led to better overall health and energy levels.
Understanding Readiness Scores
The Oura Ring also provides a readiness score. This score indicates how prepared your body is for the day. It considers factors like sleep, activity, and heart rate variability.
- Sleep Score
- Activity Score
- Heart Rate Variability
Each morning, I check my readiness score. It helps me decide how to approach the day. If the score is low, I take it easy. If it’s high, I push myself harder. This feature is a game-changer for effective recovery.
Making The Switch
Switching from an Apple Watch to an Oura Ring was a big decision for me. I loved my Apple Watch, but I wanted something different. I needed a change. The Oura Ring seemed like a perfect fit. Here’s how and why I made the switch.
The Decision Process
My decision started with a list of pros and cons. I compared the features and benefits of both devices. The Apple Watch is great for fitness tracking and notifications. But, I found it bulky and distracting at times.
The Oura Ring is sleek and unobtrusive. It focuses on sleep and wellness. I liked the idea of wearing something that feels more like jewelry than tech.
Here’s a quick comparison:
| Feature | Apple Watch | Oura Ring |
|---|---|---|
| Fitness Tracking | Excellent | Good |
| Sleep Tracking | Basic | Advanced |
| Design | Bulky | Sleek |
| Battery Life | 1-2 days | 7 days |
Transitioning From Watch To Ring
Transitioning was easier than I thought. The Oura Ring app is user-friendly. I set up my profile in minutes. The ring fit comfortably on my finger. It didn’t feel like I was wearing a gadget.
I started tracking my sleep immediately. The data was insightful and easy to understand. I loved seeing my sleep patterns and readiness scores.
Here’s what I noticed:
- My sleep quality improved.
- I felt more rested.
- The ring was comfortable all day.
The switch also helped me focus more on my wellness. I wasn’t distracted by constant notifications. The Oura Ring gave me a sense of calm and mindfulness.
Living With The Oura Ring
Switching from the Apple Watch to the Oura Ring brought many changes. I wanted a new way to track my health. The Oura Ring did not disappoint.
Daily Usage And Insights
The Oura Ring is small and light. I wear it all day without feeling it. It tracks my steps, sleep, and heart rate. The data is easy to see in the app.
The app gives me daily insights. It tells me how well I slept and how ready I am for the day. I can see my activity levels and heart rate trends. The insights are clear and useful.
| Feature | Oura Ring |
|---|---|
| Step Tracking | Yes |
| Sleep Analysis | Yes |
| Heart Rate Monitoring | Yes |
| Battery Life | Up to 7 days |
Impact On Lifestyle And Wellness
The Oura Ring improved my daily habits. I pay more attention to my sleep and activity. The ring’s insights help me make better choices.
My sleep quality has improved. I now go to bed earlier. The ring shows me how my actions affect my sleep. This helps me make better lifestyle decisions.
My activity levels are more balanced. The ring reminds me to move more. It tracks my steps and tells me when I need rest. This balance is key for my wellness.
The Oura Ring has a long battery life. I only charge it once a week. This makes it very convenient to use.
Overall, the Oura Ring fits easily into my daily life. It helps me stay healthy and active. The insights are valuable and easy to understand.
Reflecting On The Change
Switching from my Apple Watch to the Oura Ring was a big decision. I wondered how it would affect my daily routine. Here, I reflect on the benefits and trade-offs of this change.
Benefits Gained
The Oura Ring has brought several benefits to my life. First, it’s much less bulky than the Apple Watch. I barely notice it on my finger. This makes it easier to wear all day and night.
- Discreet design: The ring looks like a normal piece of jewelry.
- Better sleep tracking: It offers detailed insights into my sleep patterns.
- Longer battery life: The Oura Ring lasts for several days on a single charge.
These benefits have made the ring a valuable part of my daily routine.
Missing Features And Trade-offs
Despite the benefits, I miss some features of the Apple Watch. The watch had more apps and functionalities. Here’s a table of the missing features and trade-offs:
| Apple Watch Features | Oura Ring Trade-offs |
|---|---|
| Notifications | No notifications on the ring |
| Fitness tracking | Basic fitness tracking |
| Music control | No music control |
The Apple Watch offered more features, but the Oura Ring focuses on health and simplicity. These trade-offs make the ring a better fit for my needs.
The Future Of Personal Wearables
Wearable technology is evolving at a rapid pace. With every new release, people are rethinking their choices. I recently switched from my Apple Watch to the Oura Ring. This decision was driven by several factors, all pointing towards the future of personal wearables.
Evolving Preferences
People’s preferences are changing. The Apple Watch offers many features, but it is bulky. The Oura Ring is sleek and lightweight. It fits comfortably on any finger.
Many users want their devices to be unobtrusive. They don’t want to feel the presence of technology on their wrist. The Oura Ring meets this demand perfectly. It offers advanced tracking without the bulk.
Another factor is battery life. The Apple Watch needs frequent charging. The Oura Ring lasts longer on a single charge. This is a huge advantage for people on the go.
Predictions For Wearable Tech
The future of wearable tech looks promising. Here are some predictions:
- Smaller and more powerful devices
- Enhanced health tracking features
- Better battery life
- Increased focus on data privacy
- Integration with smart home devices
These predictions show a trend towards minimalism and efficiency. The Oura Ring aligns well with these trends. It is a step forward in the evolution of wearable tech.
Here is a quick comparison of the Apple Watch and the Oura Ring:
| Feature | Apple Watch | Oura Ring |
|---|---|---|
| Size | Bulky | Sleek and lightweight |
| Battery Life | 1-2 days | 5-7 days |
| Health Tracking | Comprehensive | Advanced |
| Comfort | Wrist-based | Finger-based |
The Oura Ring is not just a gadget. It is a glimpse into the future of personal wearables. Its design and functionality make it an ideal choice for modern users.

Credit: www.iphonelife.com
Frequently Asked Questions
Is The Apple Watch Better Than The Oura Ring?
The Apple Watch offers more features and versatility. The Oura Ring excels in sleep tracking and minimalism. Your choice depends on your needs.
How To Use Apple Watch And Oura Ring Together?
To use Apple Watch and Oura Ring together, sync both devices with Apple Health. Monitor activity and sleep data in the Health app.
Does Oura Ring Write To Apple Health?
Yes, the Oura Ring syncs data with Apple Health. It tracks sleep, activity, and readiness metrics effectively.
What Is The Difference Between Apple Watch Series 8 And Oura Ring 3?
The Apple Watch Series 8 offers a comprehensive smartwatch experience with notifications, apps, and fitness tracking. Oura Ring 3 focuses on sleep, activity, and readiness monitoring.
Conclusion
Choosing the Oura Ring over the Apple Watch has been a game-changer. The Oura Ring offers better sleep tracking and minimalist design. It fits seamlessly into my lifestyle, providing comprehensive health insights. For those seeking a sleek, effective wellness tool, the Oura Ring is a fantastic choice.
Make the switch and experience the difference.