To scan on an iPhone, open the Notes app and tap the camera icon. Select “Scan Documents” and position your document in view.
Scanning documents on your iPhone is a quick and efficient process. The built-in Notes app offers a seamless way to digitize paperwork without needing third-party apps. Whether you’re archiving receipts, contracts, or personal notes, the iPhone’s camera captures high-quality scans.
This feature is particularly useful for professionals and students who need to manage documents on the go. The scanned files can be saved, shared, or edited directly within the app. With just a few taps, you can transform physical documents into digital format, enhancing productivity and organization. This guide will help you master the scanning feature on your iPhone.
Introduction To Iphone Scanning
Scanning documents on your iPhone has never been easier. With advancements in technology, your iPhone can now act as a portable scanner. This feature is incredibly useful for both personal and professional needs. Let’s dive into the world of iPhone scanning.
The Convenience Of Mobile Scanning
Using your iPhone to scan documents is extremely convenient. You no longer need bulky scanners or printers. All you need is your iPhone, and you can scan documents on the go. This is perfect for students, professionals, and even at home.
Mobile scanning saves time and space. You can instantly share your scanned documents via email or cloud services. This makes it easy to store and organize your documents digitally.
Advancements In Iphone Camera Technology
The iPhone camera has seen significant improvements over the years. These advancements make it an excellent tool for scanning. The camera now captures high-resolution images, ensuring your scanned documents are clear and legible.
With features like auto-focus and image stabilization, your scans are always sharp. The iPhone also offers built-in editing tools. You can crop, rotate, and adjust the brightness of your scans for the best results.
| Feature | Benefit |
|---|---|
| High-resolution camera | Clear and detailed scans |
| Auto-focus | Sharp images |
| Image stabilization | Less blurring |
| Built-in editing tools | Easy to adjust scans |
With these features, your iPhone is a powerful scanning tool. You can scan receipts, documents, and even photos with ease.
- Open the Notes app.
- Create a new note.
- Tap the camera icon.
- Select “Scan Documents”.
- Align the document in the viewfinder.
- Tap the shutter button to capture.
- Adjust the corners to fit the scan.
- Tap “Keep Scan”.
With these simple steps, you can scan any document using your iPhone. It’s fast, efficient, and incredibly useful.
Preparations Before Scanning
Before scanning documents with your iPhone, it’s crucial to make some preparations. These steps will ensure clear and legible scans. Follow these simple guidelines to achieve the best results.
Selecting The Right Documents
Choose documents that are clean and free from stains. Avoid using crumpled or torn papers. Ensure the text is legible and not faded. Remove any staples or paper clips. They can cause shadows and obscure text.
Finding Optimal Lighting Conditions
Lighting plays a significant role in capturing clear scans. Natural light is the best option. If possible, place the document near a window. Avoid direct sunlight as it can cause glare. Artificial light can also work. Use a lamp to reduce shadows.
Ensure even lighting across the entire document. Shadows and uneven light can result in unclear scans. Position the light source to the side of the document. This prevents your iPhone from casting shadows.
Using The Notes App For Scanning
The iPhone’s Notes app is a powerful tool for scanning documents. You can quickly scan, edit, and share documents without any additional apps. Follow these steps to make the most of this feature.
Step-by-step Scanning With Notes
- Open the Notes app: Tap on the Notes app icon on your iPhone.
- Create a new note: Tap the new note icon at the bottom right corner.
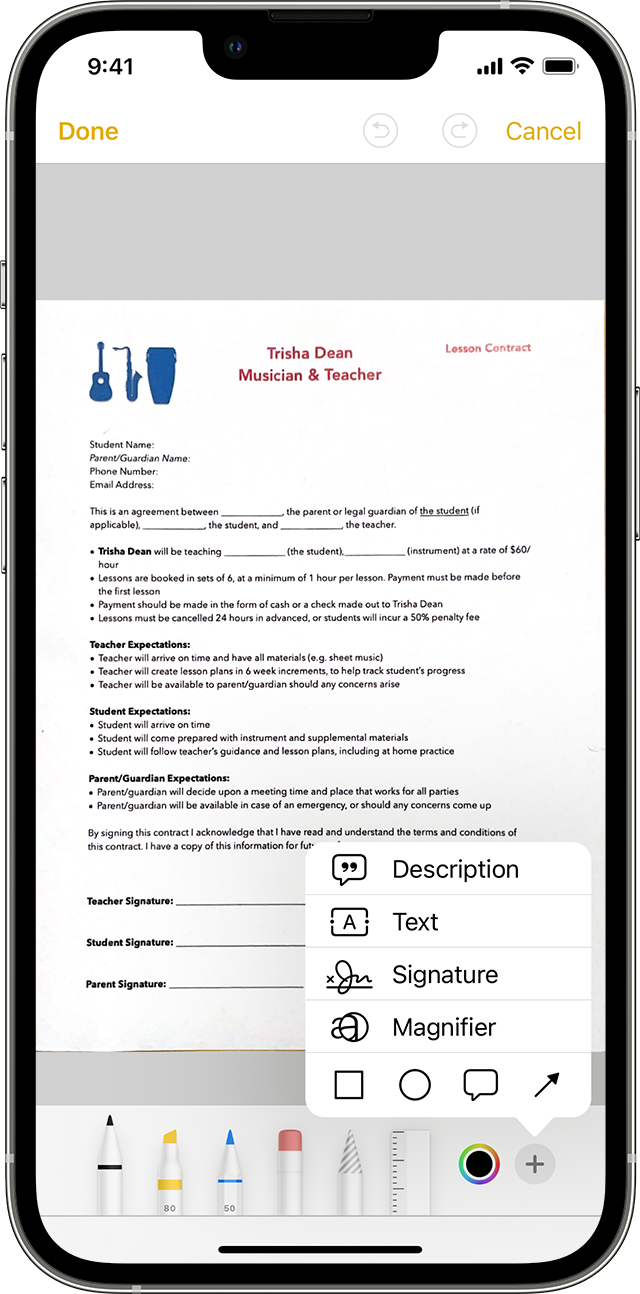
- Access the scanning feature: Tap the camera icon above the keyboard.
- Select “Scan Documents”: Choose “Scan Documents” from the menu.
- Position your document: Hold your iPhone over the document you want to scan.
- Capture the scan: The app will automatically capture the document. You can also tap the shutter button to manually scan.
- Adjust the scan: Drag the corners to adjust the scan area. Tap “Keep Scan” to save.
- Finish and save: Tap “Save” when you’re done scanning all pages.
Editing And Sharing Scanned Documents
Once you’ve scanned your document, you can easily edit and share it. Here are the steps to follow:
- Edit your scan: Open the scanned document in the Notes app. Tap the scan to make adjustments.
- Crop and rotate: Use the crop and rotate tools to perfect your scan.
- Apply filters: Choose from filters like black & white, grayscale, and more.
- Share your document: Tap the share icon at the top right. Choose how you want to share it (email, message, etc.).
Third-party Scanning Apps
Scanning documents using your iPhone is easier with third-party apps. These apps offer advanced features that the built-in iPhone scanner might lack. Let’s dive into the best scanning apps available.
Top-rated Scanning Applications
Here are some of the top-rated scanning apps for your iPhone:
- Adobe Scan: This app offers high-quality scans and cloud storage.
- CamScanner: Known for its versatility and editing tools.
- Scanner Pro: Provides excellent text recognition (OCR) capabilities.
- Microsoft Office Lens: Integrates seamlessly with Microsoft Office.
- Genius Scan: Simple to use with reliable scanning features.
Comparing Features And Pricing
| App | Features | Pricing |
|---|---|---|
| Adobe Scan |
|
Free with in-app purchases |
| CamScanner |
|
Free with subscription options |
| Scanner Pro |
|
One-time purchase |
| Microsoft Office Lens |
|
Free |
| Genius Scan |
|
Free with premium options |
Optimizing Scan Quality
Scanning documents with your iPhone can be very convenient. Yet, optimizing the scan quality is key for professional results. This section guides you through the steps to ensure your scans are clear and crisp.
Adjusting Focus And Exposure
Proper focus and exposure settings can make a big difference. Use these tips to adjust them:
- Tap to Focus: Tap on the screen where the text is. This helps your iPhone focus on the important parts.
- Adjust Exposure: After tapping to focus, swipe up or down. This will adjust the exposure. Make sure the text is not too bright or too dark.
- Hold Steady: Keep your iPhone steady. This prevents blurry scans.
Tips For Clear And Crisp Scans
Follow these tips for the best scan quality:
- Good Lighting: Ensure your document is well-lit. Natural light works best.
- Flat Surface: Place the document on a flat surface. This avoids shadows and distortions.
- Use the Grid: Turn on the grid in the camera settings. It helps align the document perfectly.
- Clean Lens: Wipe your camera lens. Dust and smudges can ruin the scan quality.
Below is a table summarizing the key tips:
| Tip | Description |
|---|---|
| Tap to Focus | Tap on the text to focus on it. |
| Adjust Exposure | Swipe up or down to make the text clear. |
| Good Lighting | Use natural light for best results. |
| Flat Surface | Place the document flat to avoid shadows. |
| Use the Grid | Align the document using the grid. |
| Clean Lens | Wipe the camera lens to remove dust. |
By following these simple tips, you can ensure your iPhone scans are always high-quality and professional.
Credit: www.engadget.com
File Management Post-scanning
After scanning documents on your iPhone, managing these files efficiently is crucial. Proper file management ensures easy access and organization. This section will guide you through organizing scanned files and syncing across devices with iCloud.
Organizing Scanned Files
Start by creating specific folders for different types of documents. For example:
- Receipts
- Invoices
- Personal Documents
- Work Documents
Using clear folder names helps locate files quickly. Keep your folders organized by following these steps:
- Open the Files app on your iPhone.
- Create new folders for each document type.
- Move scanned files into their corresponding folders.
Regularly review and update your folders. This ensures that your files remain organized and easy to find.
Syncing Across Devices With Icloud
Syncing scanned documents with iCloud allows access from any Apple device. To set up iCloud sync:
- Open Settings on your iPhone.
- Tap on your name at the top.
- Select iCloud.
- Toggle on iCloud Drive.
- Ensure the Files app is enabled for iCloud.
Once synced, your files are accessible on all your devices. This includes your iPad, Mac, and even through the iCloud website.
Keep your documents up-to-date by syncing regularly. This ensures you always have the latest version available.
Here’s a quick view of the iCloud settings:
| Setting | Status |
|---|---|
| iCloud Drive | Enabled |
| Files App | Enabled |
By following these steps, managing your scanned files on iPhone becomes seamless. You can keep everything organized and accessible from anywhere.
Advanced Scanning Features
The iPhone has revolutionized the way we handle documents. With its advanced scanning features, you can easily digitize your important papers. Let’s dive into some of these features.
Utilizing Ocr Technology
OCR stands for Optical Character Recognition. It allows your iPhone to convert scanned images into text. This means you can edit the scanned text directly on your phone. For example, scan a document and make quick changes without retyping.
This feature is especially useful for converting printed documents into editable text. Imagine scanning a book page and extracting quotes instantly. OCR technology makes this possible and easy.
Batch Scanning Capabilities
Batch scanning lets you scan multiple pages into a single document. This is perfect for lengthy reports or books. Instead of scanning each page one by one, you can do it all at once.
To use batch scanning, open your scanning app and select the batch mode. Place each page under the camera, and the app will handle the rest. This feature saves time and keeps your documents organized.
| Feature | Description |
|---|---|
| OCR Technology | Convert images to editable text |
| Batch Scanning | Scan multiple pages into one document |
The iPhone’s advanced scanning features offer incredible convenience. Whether you need to edit text or scan many pages at once, your iPhone has you covered. These tools make document management a breeze.
Troubleshooting Common Scanning Issues
Scanning documents with an iPhone is usually straightforward. However, sometimes problems arise that can make the process frustrating. This section will help you resolve the most common scanning issues.
Dealing With Blurry Scans
Blurry scans can make your documents unreadable. Here are some steps to fix this problem:
- Clean the Camera Lens: Dust or smudges on the lens can cause blurry images. Use a soft cloth to clean the lens.
- Hold Your iPhone Steady: Shaky hands can lead to blurry scans. Rest your elbows on a table or use both hands to keep the phone steady.
- Good Lighting: Poor lighting can affect the quality of your scan. Make sure you have ample light or use the flash on your iPhone.
Resolving App Malfunctions
Sometimes, the scanning app may not work properly. Follow these tips to troubleshoot:
- Restart the App: Close the app and reopen it. This simple step can solve many issues.
- Update the App: Check for updates in the App Store. An outdated app can have bugs that cause malfunctions.
- Reinstall the App: Delete the app and reinstall it. This can fix corrupted files or settings.
- Check Permissions: Ensure the app has permission to access your camera and photos. Go to
Settings > Privacy > CameraandSettings > Privacy > Photos.
Security And Privacy Considerations
Scanning documents on an iPhone is easy and convenient. But it is important to consider security and privacy. Here are some tips to help you stay safe while scanning.
Protecting Sensitive Information
Always protect your sensitive information when scanning. Ensure you are in a private place. Avoid public areas where others can see your screen.
Use apps that offer encryption. This keeps your scanned documents safe. Encryption means your data is turned into a code. Only you can read it.
Delete scans you no longer need. This reduces the risk of your information being stolen. Regularly check and clean your files.
Consider using a secure cloud service. Store your scanned documents safely online. Choose a service that offers strong security features.
Understanding App Permissions
Check app permissions before using them. Some apps ask for access to your photos, contacts, or location. Make sure the app really needs this information.
Limit the permissions you give. Only allow the app to access necessary features. For example, a scanning app needs access to your camera but not your contacts.
Review the app’s privacy policy. Understand how your data is used and stored. Look for apps that respect your privacy.
Update your apps regularly. App updates often include security improvements. Keeping your apps updated helps protect your data.
| Steps | Description |
|---|---|
| 1 | Find a private place to scan. |
| 2 | Use apps with encryption. |
| 3 | Delete unneeded scans. |
| 4 | Use secure cloud services. |
| 5 | Check and limit app permissions. |
| 6 | Review privacy policies. |
| 7 | Update apps regularly. |
Following these steps can help keep your scans safe. Always be cautious with your sensitive information.
Credit: support.apple.com
Future Of Scanning With Iphones
The future of scanning with iPhones looks bright. Apple’s continuous innovations make scanning easier and more efficient. New technologies and features are constantly being developed. These advances will change how we use iPhones for scanning.
Emerging Technologies
Artificial Intelligence (AI) plays a big role in scanning advancements. AI can automatically recognize and enhance scanned documents. This makes scans clearer and easier to read. Machine Learning (ML) improves the accuracy of text recognition. This helps in converting scanned documents into editable text.
Augmented Reality (AR) is another technology to watch. AR can overlay digital information on the real world. This helps in aligning documents perfectly for scanning. 3D scanning is becoming more common. iPhones with LiDAR sensors can create detailed 3D models of objects. This is useful for design and modeling tasks.
Predictions For The Next Iphone
The next iPhone may have even more powerful scanning features. Improved camera sensors will capture higher-quality images. This results in clearer and more detailed scans. Advanced AI and ML capabilities will enhance text recognition and document processing. This will make scanning faster and more accurate.
Better integration with cloud services is expected. This will allow seamless storage and sharing of scanned documents. Enhanced security features will protect scanned documents from unauthorized access. New AR and 3D scanning capabilities may be introduced. This will open up new possibilities for creative and professional uses.
| Feature | Benefit |
|---|---|
| AI and ML | Better text recognition and image enhancement |
| AR | Perfect alignment for scanning |
| 3D Scanning | Detailed 3D models of objects |
| Improved Camera Sensors | Higher-quality images |
| Cloud Integration | Seamless storage and sharing |
| Enhanced Security | Protects scanned documents |

Credit: www.cnbc.com
Frequently Asked Questions
How Do I Scan Using My Iphone?
Open the Notes app. Tap the camera icon. Select “Scan Documents. ” Position your document in view. Save the scanned document.
How Do You Scan An Image With Iphone?
Open the Notes app. Tap the camera icon, then select “Scan Documents. ” Position the image, and it will auto-scan.
How To Scan Photo As Pdf On Iphone?
Open the Notes app. Create a new note. Tap the camera icon. Select “Scan Documents. ” Capture the photo. Save as PDF.
How To Scan Bar Code On Iphone?
Open the Camera app. Point it at the barcode. A notification will appear. Tap it to view details.
Conclusion
Mastering how to scan on an iPhone is simple and efficient. Follow the steps to digitize documents quickly. This feature enhances productivity, making it easier to manage paperwork. Try it out and streamline your document handling today. Scanning on an iPhone has never been more convenient and accessible.