To add an attachment to a calendar event, open the event and click on the attachment option. Upload your file to attach it.
Adding attachments to calendar events enhances productivity and keeps all relevant information in one place. Whether scheduling a business meeting or planning a personal event, including essential documents helps attendees stay organized. Google Calendar, Outlook, and other calendar apps offer simple steps to attach files directly to events.
This feature is especially useful for sharing agendas, presentations, or any necessary documents. Users can easily upload files from their computer or cloud storage services. By integrating attachments into calendar events, you can ensure everyone has access to the necessary resources, making your events more effective and streamlined.
Credit: workspaceupdates.googleblog.com
Introduction To Calendar Event Attachments
Adding attachments to calendar events makes meetings more productive. You can share files, presentations, or notes. This helps everyone stay prepared and informed.
Why Attach Files?
Attaching files to calendar events has many benefits. It ensures attendees have all necessary information. This reduces confusion and increases efficiency.
Here are some reasons to attach files:
- Share meeting agendas
- Distribute presentation slides
- Provide relevant documents
- Include images or diagrams
Types Of Attachments
You can attach various file types to calendar events. This flexibility allows you to share different formats based on your needs.
Common types of attachments include:
| File Type | Example Uses |
|---|---|
| Meeting agendas, Reports | |
| Word Documents | Project plans, Proposals |
| Excel Sheets | Budgets, Data analysis |
| Images | Diagrams, Infographics |
| PowerPoint | Presentations, Slideshows |
Credit: tapintoteenminds.com
Preparation Before Adding Attachments
Before attaching files to your calendar event, a few steps are essential. Proper preparation ensures smooth and efficient attachment integration. Follow these guidelines to make the process seamless.
Choosing The Right File Format
Pick the most suitable file format for your attachment. Common formats like PDF, DOCX, and JPEG are widely supported. Ensure your file format is compatible with the calendar application.
Refer to the table below for common formats and their uses:
| File Format | Use Case |
|---|---|
| Documents and presentations | |
| DOCX | Text documents |
| JPEG | Images |
File Size Limits
Check the file size limit for your calendar application. Different platforms have different limits. Ensure your attachment does not exceed these limits.
Here are some common platforms and their file size limits:
- Google Calendar: 20 MB
- Outlook: 25 MB
- Apple Calendar: 50 MB
If your file is too large, consider compressing it. Use tools to reduce file size without losing quality.
Step-by-step Guide For Google Calendar
Adding attachments to Google Calendar events is simple. This guide will help you through the process. Follow these steps to make your events more informative and engaging.
Creating A New Event
Start by opening Google Calendar. Click the “Create” button. This will open a new event window.
Fill in the necessary details like the event title, date, and time.
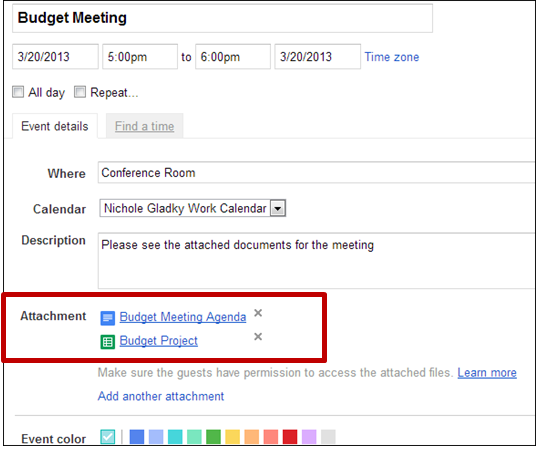
Adding Attachments
Once the event details are filled, look for the paperclip icon. Click on it to add an attachment.
Select the file you want to attach from your computer or Google Drive. The file will upload and attach to the event.
Sharing With Participants
After adding the attachment, you can share the event with participants. Enter their email addresses in the “Guests” field.
Click the “Save” button. A prompt will ask if you want to send invitations to the guests. Click “Send” to notify them.
Now, your event is ready with the attachment. Participants will receive the invitation with the file attached.
Adding Attachments In Outlook Calendar
Adding attachments to your Outlook Calendar events can streamline your workflow. It allows you to share important documents, presentations, and files directly in your calendar invites. This feature ensures that all participants have access to the necessary materials beforehand. Here’s a step-by-step guide to help you add attachments to your Outlook Calendar events.
Starting A New Meeting Request
To start, open your Outlook Calendar and click on New Meeting. This will open a new meeting request form. Fill in the details such as the Title, Date, and Time. Add the email addresses of the attendees in the To field.
Utilizing The ‘insert’ Option
After filling in the meeting details, click on the Insert tab in the toolbar. From the drop-down menu, choose Attach File. You can select a file from your computer or cloud storage. Once selected, the file will appear in the meeting request.
Notifying Attendees
With the attachment added, notify your attendees by sending the meeting request. Click on Send to distribute the invite. Attendees will receive the invite with the attached files.
Adding attachments to your Outlook Calendar events enhances communication and collaboration. Follow these steps to ensure all participants are prepared for the meeting.
Working With Apple Calendar
Working with Apple Calendar can streamline your scheduling. Adding attachments to events can further enhance your productivity. Here’s a step-by-step guide on how to add an attachment to a calendar event in Apple Calendar.
New Event Creation
Creating a new event in Apple Calendar is simple. Follow these steps:
- Open the Apple Calendar app.
- Click the ‘+’ button in the top right corner.
- Enter the event details: name, date, and time.
Attachment Process
Attaching files to your events can be very useful. Here’s how to do it:
- Create or open an event in Apple Calendar.
- Click on Edit to modify the event.
- Scroll down to find the ‘Add Attachment’ option.
- Click Add Attachment and choose your file.
- Save the event to secure the attachment.
Inviting Attendees
You can easily invite attendees to your event. Here’s the process:
- Create or open an event in Apple Calendar.
- Click on Edit to modify the event.
- Scroll down to find the ‘Invitees’ section.
- Click Add Invitees and enter email addresses.
- Save the event to send invites.
Adding attachments and inviting attendees is seamless in Apple Calendar. These features ensure your events are well-organized and effective.
Best Practices For Calendar Event Attachments
Adding attachments to calendar events can greatly enhance productivity. These attachments provide crucial information in one place. However, it’s important to follow some best practices. These ensure that your attachments are useful and accessible to everyone.
Naming Files Clearly
Always give your files clear and descriptive names. Avoid using generic names like “document” or “file”. Instead, use specific names such as “Meeting Agenda – March 2023” or “Project Plan – Q2”. Clear names help participants identify the content quickly.
Checking Accessibility
Ensure your attachments are accessible to all participants. Use standard file formats like PDF or DOCX. Avoid using formats that may not be universally accessible. Additionally, check that the file size is reasonable. Large files can be difficult to download and view.
Reminder For Participants
Send a reminder to participants about the attached files. Mention the attachments in your event description. This helps participants know what to review before the meeting. Additionally, it ensures everyone is prepared and on the same page.
| Best Practice | Description |
|---|---|
| Naming Files Clearly | Use descriptive and specific file names. |
| Checking Accessibility | Ensure files are in accessible formats and reasonable size. |
| Reminder for Participants | Mention attachments in event description and send reminders. |
Following these best practices will make your calendar events more efficient. Participants will appreciate the clarity and accessibility of the attached files. This helps everyone stay informed and prepared.
Troubleshooting Common Issues
Adding attachments to calendar events is usually straightforward. Yet, sometimes you may encounter issues. Below are common problems and how to fix them.
Attachment Not Showing
If the attachment is not showing, check a few things:
- Ensure the file is uploaded correctly.
- Verify the file format is supported.
- Refresh the calendar to see updates.
File Too Large Errors
Sometimes, the file size may be too large. Here’s how to handle this:
- Check the maximum file size allowed.
- Compress the file to reduce its size.
- Use cloud storage links if the file is still too large.
| Service | Max File Size |
|---|---|
| Google Calendar | 20 MB |
| Outlook Calendar | 25 MB |
Permission Problems
Sometimes, the attachment is not visible due to permissions. Here are steps to fix this:
- Ensure you have the right to attach files.
- Check if the calendar is shared with the right people.
- Verify the attachment permissions in your calendar settings.
By addressing these common issues, you can easily add attachments to your calendar events.
Credit: it.stonybrook.edu
Enhancing Collaboration With Event Attachments
Adding attachments to calendar events boosts collaboration. Teams can share documents, images, and other files directly within the event. This feature enhances communication and productivity.
Benefits For Remote Teams
Remote teams face unique challenges. Event attachments help overcome these hurdles. Sharing attachments keeps everyone on the same page. No one misses important documents. This is crucial for meeting preparation.
- Improves document accessibility
- Reduces the need for follow-up emails
- Streamlines communication
All team members access the same files instantly. This is vital for quick decision-making. Remote workers feel more connected.
Integrating With Cloud Storage
Integrating calendar events with cloud storage is a game-changer. Services like Google Drive or Dropbox sync easily. This ensures files are always up-to-date.
| Cloud Storage Service | Key Features |
|---|---|
| Google Drive | Real-time collaboration, easy sharing |
| Dropbox | Large file storage, secure access |
Attachments from cloud storage update automatically. This reduces errors and confusion. Team members always have the latest version.
Feedback And Iteration
Event attachments facilitate feedback. Teams can review documents and provide input. This process is seamless and efficient.
- Attach the document to the event
- Team members review and add comments
- Document is revised based on feedback
This cycle continues until the document is final. It ensures high-quality outcomes. Teams work better together and produce better results.
Frequently Asked Questions
How Do I Add An Attachment To A Calendar Event?
To add an attachment, open the event, click “Add attachment” or “Add file,” and upload your document. Save the event.
Can I Attach Files To Google Calendar Events?
Yes, you can attach files to Google Calendar events. Open the event, select “Add attachment,” and choose your file.
What Types Of Files Can Be Attached?
You can attach various file types like PDFs, images, and documents. Ensure your file is within the size limit.
Do Attachments Sync With All Devices?
Yes, attachments sync with all devices. Ensure you are logged into the same account on each device.
Conclusion
Mastering how to add an attachment to a calendar event boosts your productivity. It keeps important documents accessible. Following the steps outlined ensures seamless event planning. Enhance your organizational skills by utilizing this feature. Stay efficient and keep your calendar events well-documented with attachments.
Enjoy a more streamlined and effective planning process.