Blogs

How to Turn Off Icloud on Iphone in a Few Easy Steps
Blogs

How to Turn Off iCloud on iPhone: Quick & Simple Guide

How to Turn Off iCloud on iPhone: Quick & Simple Guide   To turn off iCloud on your iPhone, go to Settings, tap your name, then select “Sign Out” at the bottom. Enter your Apple ID and password to confirm. ICloud is a useful service for syncing and storing data across Apple devices. However, some users may prefer to disable it for privacy or storage reasons. Turning off iCloud can help you manage storage more effectively and keep your data more secure. It’s a straightforward process that can be done in a few simple steps. Whether you want to stop syncing certain apps or completely sign out of iCloud, this guide will help you accomplish that easily. Follow these steps to ensure your iPhone runs just the way you prefer. Introduction To Icloud Services On Iphone iCloud is a cloud storage service from Apple. It helps you store data like photos, documents, and more. Your iPhone uses iCloud to keep your information safe. This service makes it easy to access your data from any Apple device. Many people love using iCloud for its convenience. It automatically backs up your data. If you get a new iPhone, you can quickly restore your old data. This feature saves time and effort. The Role Of Icloud On Your Device iCloud plays a key role on your iPhone. It syncs your photos, emails, and contacts. It also backs up your app data. This ensures that you don’t lose important information. You can also use iCloud Drive. This feature lets you store files and access them from any device. Your iPhone uses iCloud to keep your calendar, notes, and reminders up-to-date. Feature Role Photos Syncs and backs up your photos Contacts Keeps your contacts updated across devices iCloud Drive Stores files and makes them accessible App Data Backs up data for apps Reasons To Consider Disabling Icloud Privacy Concerns: Some people worry about their data being stored in the cloud. Storage Limits: Free iCloud storage is limited to 5GB. This can fill up quickly. Device Performance: Syncing data can slow down your iPhone. Personal Preference: You may prefer to store data locally. Turning off iCloud can help you save storage space. It can also improve your iPhone’s performance. You may feel more secure keeping your data on your device. Preparatory Steps Before Turning Off Icloud Before turning off iCloud on your iPhone, there are crucial steps you must take. These steps ensure your data is safe and nothing important is lost. Follow these preparatory steps to have a smooth process. Backing Up Your Data Backing up your data is essential. This ensures you don’t lose any important information. Here are the steps you should follow: Open Settings on your iPhone. Tap on your Apple ID at the top. Go to iCloud and then iCloud Backup. Tap Back Up Now and wait for the process to complete. This step will back up your contacts, photos, and other important data. Ensure you have a stable Wi-Fi connection during this process. Understanding What Data Will Be Affected Turning off iCloud affects various types of data. It’s crucial to understand what will be impacted. Here’s a breakdown: Data Type Effect when iCloud is turned off Contacts Contacts will no longer sync across devices. Photos Photos will not upload to iCloud Photo Library. Notes Notes will not sync across devices. Documents Documents in iCloud Drive will not be accessible. Consider the impact on each type of data. This way, you can take necessary actions to back up or sync data before turning off iCloud. Sign Out Of Icloud On Your Iphone     Signing out of iCloud on your iPhone is simple. This step ensures your data stays private. Follow the steps below to sign out of iCloud on your iPhone. Step-by-step Guide To Sign Out Open the Settings app on your iPhone. Tap on your name or Apple ID at the top of the screen. Scroll down and tap Sign Out. Enter your Apple ID password when prompted. Tap Turn Off to disable Find My iPhone. Choose which data you want to keep on your device. Toggle the switches next to each type of data. Tap Sign Out in the upper-right corner. Confirm by tapping Sign Out again. Troubleshooting Sign-out Issues If you face issues signing out of iCloud, try these solutions: Ensure you have a stable internet connection. Check that your Apple ID password is correct. Restart your iPhone and try signing out again. Update your iPhone to the latest iOS version. If problems persist, contact Apple Support for further assistance. Disabling Icloud Features Individually     Turning off iCloud features individually can help you manage your data better. By doing this, you can choose which services to keep and which to disable. This way, you can save storage and enhance your iPhone’s performance. Let’s look into the steps to disable specific iCloud features. How To Turn Off Icloud Photos Open the Settings app on your iPhone. Tap on your Apple ID banner at the top. Select iCloud from the list. Tap on Photos. Toggle off iCloud Photos. Turning off iCloud Photos will stop automatic photo uploads. Your new photos won’t sync to iCloud. Managing Icloud Drive & Other Apps You can also manage iCloud Drive and other app data individually. Follow these steps to turn off iCloud Drive and other apps: Open the Settings app on your iPhone. Tap on your Apple ID banner at the top. Select iCloud from the list. Scroll down to find iCloud Drive and other apps. Toggle off the switch next to iCloud Drive. Toggle off the switches next to other apps you want to disable. Turning off these features will prevent apps from syncing their data to iCloud. This can help save space and improve your device’s performance. Turning Off Icloud Backup iCloud Backup is a convenient feature for iPhone users. It automatically saves data to Apple’s cloud storage. But, there are times when you might want to turn it

How to Record a Phone Call on an Iphone for Free
Blogs

How to Record a Phone Call on an iPhone for Free: Quick Guide

How to Record a Phone Call on an iPhone for Free: Quick Guide   To record a phone call on an iPhone for free, use a third-party app like Google Voice or TapeACall. These apps offer straightforward solutions. Recording phone calls on an iPhone can be essential for various reasons, such as preserving important conversations or conducting interviews. Apple doesn’t natively support call recording due to privacy laws, but third-party apps provide viable solutions. Google Voice, for instance, allows free call recording but requires you to use a Google Voice number. TapeACall offers a free version with limited features. Always inform the other party before recording to comply with legal requirements. This guide will walk you through the steps to use these apps effectively, ensuring you can keep a record of your important calls without spending a dime. Introduction To Iphone Call Recording Recording phone calls on an iPhone can be useful. Some people need to keep track of conversations. Others need to capture details for future reference. The good news is that you can record calls for free. Many iPhone users want to know how to do this. It is important to understand both the legal and practical aspects. This guide will help you navigate the process smoothly. The Legality Of Call Recording Before recording any call, understand the laws. Call recording laws vary by country and state. In some places, both parties must agree to the recording. In other places, only one party needs to know. Check your local laws. Ensure you comply to avoid legal issues. Always inform the other person if required by law. Reasons For Recording Calls There are many reasons to record phone calls. Here are some common ones: Business meetings: Capture details and action items. Interviews: Keep a record for accuracy. Customer service: Document important conversations. Personal use: Save memorable conversations with loved ones. Each of these reasons can help you stay organized and informed. Recording calls can be a valuable tool in many scenarios. Built-in Options On Iphone Recording a phone call on an iPhone can be tricky. Apple has strict privacy policies. But there are some built-in options you can use. These options do not need any third-party app. They can help you record calls for free. Using Voicemail For Recording One method to record a call is by using your voicemail. Follow these steps: Make a call to the person you want to record. Tap on the “Add Call” button and dial your own phone number. The call will go to your voicemail. Once the voicemail starts recording, tap “Merge Calls”. The conversation will be recorded in your voicemail. Voicemail recording is easy to use. It is free and doesn’t need extra apps. But it has some limitations. Let’s look at them next. Limitations Of Native Solutions Using built-in options like voicemail has several limitations: Legal issues: In some places, recording calls without consent is illegal. Always inform the other party. Quality: The audio quality may not be great. It depends on your network and voicemail service. Storage: Voicemail recordings can take up space in your mailbox. You might need to delete old messages. Duration: Voicemail services may have time limits. Long calls might get cut off. Despite these limitations, using voicemail can be a quick fix for recording calls. It is a good option if you need a simple and free solution. Using Third-party Apps Recording a phone call on an iPhone for free might seem tricky. Using third-party apps can make this task easy. This section will guide you through selecting the right app and the steps to record calls. Selecting A Reliable App Choosing a reliable app is crucial. Ensure the app has good reviews and ratings. Check if it is free or has hidden charges. Here are some popular apps: Rev Call Recorder: Offers free call recording. Easy to use. Google Voice: Free service. Requires a Google account. TapeACall: Free trial available. Simple interface. Look for these features in the app: Ease of use: Simple interface and instructions. Clear audio quality: Ensures you can hear the recording well. Secure storage: Keeps your recordings safe. Step-by-step Recording Process Once you select a reliable app, follow these steps to record a call: Download and install: Get the app from the App Store. Open the app: Launch it on your iPhone. Create an account: Sign up if required. Grant permissions: Allow access to the microphone and contacts. Start recording: Follow the app’s instructions to begin recording. Make the call: Dial the number or select a contact. Save the recording: End the call and save the recording. Here’s a basic example of how the process might look using the Rev Call Recorder app: Step Action 1 Open Rev Call Recorder. 2 Tap on “Start Recorded Call”. 3 Choose “Outgoing Call” or “Incoming Call”. 4 Follow on-screen instructions to record the call. 5 Save the recording after the call ends. Recording calls with third-party apps is simple. Always check local laws before recording any call. Credit: m.youtube.com Recording Calls With Google Voice Recording phone calls on an iPhone can be challenging. But, using Google Voice makes it easier. Google Voice is a free service. It allows you to record incoming calls. Follow these steps to set it up. Setting Up Google Voice First, you need to set up Google Voice on your iPhone. Follow these steps: Download the Google Voice app from the App Store. Open the app and sign in with your Google account. Choose a Google Voice number. This number will link to your iPhone. Verify your existing phone number. Google Voice will send you a code. Enter this code to complete the setup. Now, you have set up Google Voice on your iPhone. Next, you need to enable the call recording feature. Activating Call Recording Feature To activate the call recording feature in Google Voice, follow these steps: Open the Google Voice app on your iPhone. Tap the menu icon (three horizontal lines) in the top-left corner.

10 Best Ai Apps for Iphone in 2024
Blogs

10 Best AI Apps for iPhone in 2024: Let’s Reveal

10 Best AI Apps for iPhone in 2024 : Let’s Reveal   The 10 best AI apps for iPhone in 2024 include Siri, Replika, and Lensa AI. These apps offer advanced features that enhance user experience. Artificial Intelligence has revolutionized the mobile app landscape, providing users with smarter, more intuitive tools. AI apps on iPhone now offer various functionalities, from virtual assistants to photo editing. Siri remains a top choice for voice commands, while Replika excels in providing companionship through chat. Lensa AI is popular for its advanced photo editing capabilities. These apps not only make daily tasks easier but also improve productivity and creativity. As technology evolves, more innovative AI apps will emerge, making the iPhone an even more powerful device. This list highlights the best AI apps you should consider in 2024. Introduction To Ai On Iphone The world of technology is evolving at a rapid pace. One of the most exciting advancements is Artificial Intelligence (AI). AI has significantly impacted how we use our devices, making them smarter and more intuitive. iPhones are at the forefront of this AI revolution. With powerful processors and seamless integration, they offer an unparalleled AI experience. In this blog post, we will explore the 10 best AI apps for iPhone in 2024. Rise Of Ai In Daily Life AI is no longer a futuristic concept. It has become a part of our daily lives. From virtual assistants like Siri to recommendation systems on social media, AI is everywhere. These AI systems learn from our behaviors and adapt to our preferences. They make our lives easier by performing tasks like scheduling, reminders, and even driving. Smartphones, especially iPhones, have harnessed the power of AI. They use it to enhance user experience in numerous ways. This includes photography, security, and personal assistance. Why Iphone For Ai? iPhones are known for their cutting-edge technology. Apple continuously innovates to provide the best AI capabilities. Here are some reasons why iPhones are ideal for AI: Powerful A-series chips: These processors handle complex AI tasks efficiently. Seamless hardware-software integration: This ensures optimal performance and user experience. Regular updates: Apple provides frequent updates to enhance AI features. Privacy-focused: iPhones ensure that your data is secure while using AI services. With these features, iPhones stand out as the best devices for AI applications. They offer a smooth and efficient AI experience, making your daily tasks easier and more enjoyable. Criteria For Ranking Ai Apps     Selecting the best AI apps for iPhone in 2024 requires a careful look at many factors. This guide uses several key criteria to rank these apps. Each app is evaluated based on its User Interface and Experience, Functionality and Features, and overall performance. User Interface And Experience A great AI app must have an intuitive user interface. Users should easily understand how to navigate the app. The design must be clean and visually appealing. Quick response times and smooth transitions are essential. These elements ensure users have a pleasant experience. Accessibility is another important factor. The app should be usable by people of all abilities. Good apps include features like voice control and screen readers. Functionality And Features An AI app’s features determine its value. The app should offer unique and useful functions. Basic AI capabilities are not enough in 2024. Apps need to go beyond and offer advanced options. Integration with other apps and services is crucial. An app that works well with others provides a seamless experience. Customization options allow users to tailor the app to their needs. Criteria Importance User Interface and Experience High Functionality and Features High Performance Medium Ai Photo Editing Apps AI photo editing apps have transformed the way we enhance images on our iPhones. These apps use advanced algorithms to make editing quick and intuitive. With just a few taps, you can create stunning visuals. Here’s a look at some of the best AI photo editing apps for iPhone in 2024. Revolutionizing Image Processing AI photo editing apps are revolutionizing image processing. These apps can analyze photos and make smart adjustments. They enhance colors, remove blemishes, and even change backgrounds. Traditional editing tools are now a thing of the past. AI tools are faster and more efficient. The results are often better than those produced by human editors. These apps make professional-quality edits accessible to everyone. You don’t need to be a skilled photographer to create beautiful images. AI handles the technical aspects for you. Top Picks For Creatives Adobe Photoshop Express: This app offers advanced AI features. It includes one-tap auto-correct and content-aware fill. Prisma: Prisma uses AI to turn your photos into artworks. It offers a wide range of artistic filters. FaceApp: Known for its AI-driven transformations, FaceApp can change hairstyles, add makeup, and even alter ages. VSCO: VSCO combines powerful AI tools with a user-friendly interface. It offers filters and advanced editing options. Lightroom Mobile: Adobe’s Lightroom Mobile uses AI to enhance photos. It offers features like AI-driven sky replacement and object removal. These apps are perfect for creatives who want to enhance their photos. They offer a range of features that make editing easy and fun. Whether you are a professional or a hobbyist, these apps can help you create stunning images. Credit: www.iphonelife.com Ai Personal Assistants AI personal assistants have revolutionized the way we interact with our iPhones. In 2024, these apps are smarter and more efficient. They help us manage tasks, set reminders, and stay organized. Let’s explore some of the top AI personal assistants available for iPhone. Beyond Siri: New Frontiers Siri has been the go-to assistant for many iPhone users. But there are new AI personal assistants that offer more advanced features. Google Assistant: Known for its robust search capabilities. It integrates well with other Google services. Amazon Alexa: Excellent for smart home control. It offers a wide range of skills. Microsoft Cortana: Great for productivity. It integrates seamlessly with Microsoft Office. These assistants are pushing boundaries. They offer features that Siri currently lacks. Streamlining Daily Tasks

How to Resize an Image on Iphone
Blogs

How to Resize an Image on iPhone: Quick & Easy Guide

How to Resize an Image on iPhone: Quick & Easy Guide   To resize an image on an iPhone, open the Photos app, select the image, tap “Edit,” then choose the crop tool. Adjust the image’s size by dragging the corners and hit “Done” to save changes. Resizing images on an iPhone can be a quick task for those wanting to adjust their photos for social media, printing, or personal use. The process is built into the iPhone’s native Photos app, making it accessible without the need for additional software. With the increasing use of visual content online, understanding how to manipulate image dimensions is a useful skill. This guide provides a straightforward method for anyone looking to customize their images directly from their device. The iPhone’s user-friendly interface ensures that even beginners can perform this task with ease, keeping their digital content looking sharp and professional. Introduction To Image Resizing On Iphone Resizing images on an iPhone is simple and efficient. Whether you need to adjust a photo for social media or manage storage space, the iPhone offers easy tools to change image size directly from your device. Why Resize Images? Save space on your device. Make images fit specific requirements for social media or email. Speed up website loading times with smaller images. Tools You Need The iPhone comes equipped with all the tools you need to resize images: Photos app – Built-in app for easy access. Third-party apps – Additional features available. Credit: www.businessinsider.com Accessing Your Photos Accessing your photos on an iPhone is the first step to resizing them. This process is quick and user-friendly. Let’s explore how to navigate the Photos app and select the image you want to resize. Navigating The Photos App Opening the Photos app is where your image resizing journey begins. The app icon looks like a multi-colored flower. Tap it to start. Tap the Photos app on your iPhone’s home screen. Scroll through your photo library or albums to find your pictures. Use the Search feature to find a specific photo quickly. Once the app is open, you will see different views: Years, Months, Days, and All Photos. Choose the one that best helps you find your image. Selecting The Image To Resize After finding the right photo, the next step is to select it for resizing. Touch and hold the photo you wish to resize. Release to open the photo in full-screen. Tap the photo once to reveal options at the screen bottom. With the image selected, you’re ready to adjust its size. The Photos app does not directly resize, but other methods are available. Keep following along to learn how. Using Built-in Editing Features Editing images directly on an iPhone is simple. The built-in editing features let you resize photos fast. No need for extra apps. Let’s dive into how to use these tools effectively. Cropping For Quick Resizing Open your photo and select ‘Edit’ in the top right corner. Use the corners to drag and crop your image. This method is perfect for trimming unwanted edges, focusing on a subject, or changing the composition. Tap ‘Edit’ on your photo Choose the crop tool at the bottom Drag the corners to resize Hit ‘Done’ to save changes Aspect Ratio Adjustments Maintaining an aspect ratio is key for platforms like Instagram or Facebook. Your iPhone makes it easy to adjust without distorting the image. Open the crop tool in your photo editor Tap the aspect ratio button on the top right Select a ratio like 16:9 or 1:1 Move the photo within the frame to fit Press ‘Done’ to save your resized photo Remember to save a copy if you wish to keep the original size. These simple steps ensure your images are perfect for sharing! Third-party Apps For More Options For iPhone users seeking advanced image resizing options, third-party apps are a treasure trove. They offer diverse features beyond the basics. Let’s explore the top apps and tips for a smooth experience. Top App Recommendations Image Size – This app allows precise measurements and easy export options. Photo Resizer – Simple interface with quick resizing and editing tools. Resize for Story – Perfect for social media enthusiasts needing story-specific dimensions. Download And Installation Tips Check app reviews and ratings before downloading. Ensure sufficient space on your iPhone to avoid installation issues. Follow on-screen instructions carefully during installation. Allow necessary permissions for the app to function properly. Step-by-step Guide To Resizing With An App Ready to share photos at the perfect size? iPhones make it easy with a variety of apps. This guide shows you how to resize images quickly and accurately. Let’s dive into the process. Importing Your Photo Start by selecting the right app. Open the app and tap ‘Import’ or ‘Gallery.’ Choose the photo you wish to resize. It will now appear ready for editing. Customizing Dimensions After importing, it’s time to adjust. Here’s how: Access the resize tool within the app. Enter your desired dimensions manually, or select a preset size. Check the preview to ensure your photo looks great. Save or export the newly sized image to your iPhone. Credit: gooddogstrategies.com Saving And Sharing Your Resized Images Resizing images on your iPhone is a breeze, and sharing them should be just as simple. Once you have your image at the perfect size, you’ll want to save and share it with friends, family, or on social media. Let’s dive into how you can do that efficiently. Exporting Options Your iPhone gives you several ways to save and send your resized images. Save to Files: Keep a copy in iCloud Drive or on your device. Save to Photos: Add the image directly to your photo library. Use Share Sheet: Send via AirDrop, Messages, Mail, or social apps. Choose the best option to fit your needs. Image Quality Considerations Quality matters when you save and share images. Format Quality Size JPEG High Smaller PNG Higher Larger HEIF Highest Smallest Pick the right format to balance quality

How to Record a Phone Call on an Iphone for Free
Blogs

How to Record a Phone Call on iPhone for Free: Easy Steps

How to Record a Phone Call on iPhone for Free: Easy Steps   To record a phone call on an iPhone for free, use the Voice Memos app or a third-party app like Google Voice. Ensure legality and consent before recording. Recording phone conversations can be crucial for various reasons, from keeping a record of important discussions to revisiting instructions. IPhones don’t have a built-in call recording feature due to privacy laws, but there are workarounds. Free third-party applications like Google Voice allow users to record calls, albeit with some limitations and the need for consent from all parties involved. Voice Memos, another built-in app, can be used in a speakerphone scenario to capture audio. Always verify local laws as recording calls without consent can be illegal in many jurisdictions. This introduction provides a clear pathway for iPhone users to legally record phone calls without incurring additional costs. Credit: www.youtube.com Introduction To Recording Calls On Iphone Whether it’s an important business conversation or a memorable chat with a loved one, recording phone calls on your iPhone can be incredibly useful. With the right tools and knowledge, you can capture these calls for future reference or sentimental reasons. This guide will explore the simplest methods to record calls on your iPhone without spending a dime. Why Record Phone Calls? Save important information: No need to rely on memory alone. Document verbal agreements: Keep a record of commitments and promises. Review instructions: Listen again to complex directions or tasks. Cherish personal moments: Relive special conversations anytime. Legal Considerations Before Recording Always check local laws before recording any call. Consent is key. In some places, both parties must agree to the recording. In others, only one party’s consent is needed. Stay informed and compliant to avoid legal issues. Credit: www.rev.com Native Iphone Features And Limitations Understanding the native features and limitations of iPhone call recording is essential. Apple prioritizes user privacy and security. This reflects in the absence of a direct call recording feature on iPhones. Let’s explore the options available and the constraints you might face. Absence Of Built-in Call Recording Unlike some Android devices, iPhones do not offer an inbuilt call recording function. This means users cannot record phone calls with just a tap. Recording conversations is subject to legal restrictions, which vary by location. Always check local laws before attempting to record a call. Using Voicemail To Save Conversations One workaround for recording calls on your iPhone involves using the voicemail feature. This method requires carrier support for voicemail. Not all carriers offer this service. Here’s a step-by-step guide to using voicemail for recording: Make a call or answer an incoming call. Tap on the ‘Add Call’ button during the call. Dial your own number to reach your voicemail. Wait for the voicemail greeting to play, then tap ‘Merge Calls’. End the call after your conversation. The recorded audio should appear in your voicemail. Note: This method records the entire call as a voicemail message. Check your carrier’s policy on saving and accessing voicemails. Recording quality may not match dedicated recording apps or devices. Third-party Apps For Call Recording Want to record a phone call on your iPhone for free? Many third-party apps offer this feature. Let’s explore some of the best free apps available for call recording and how to choose a secure and reliable option. Top Free Apps For Call Recording Several free apps allow iPhone users to record calls. Here’s a list of top contenders: Rev Call Recorder: Unlimited recordings with no hidden costs. TapeACall Lite: Easy to use with an option to upgrade for more features. Call Recorder Lite: Records calls and offers playback controls. Ensuring App Reliability And Security Security and reliability are key when choosing a call recording app. Follow these steps to ensure safety: Read Reviews: Check user feedback on the App Store. Check Permissions: Be cautious of apps requesting unnecessary access. Privacy Policy: Always review the app’s privacy policy. Remember to respect privacy laws. Always inform the other party before recording a call. Credit: www.lifewire.com Google Voice: A Free Alternative Google Voice offers a free method to record phone calls on an iPhone. This tool is perfect for those needing simple solutions without extra costs. Setting Up Google Voice For Call Recording To start recording calls with Google Voice, follow these steps: Download the Google Voice app from the App Store. Open the app and sign in with your Google account. Tap on the three-line menu icon in the top left corner. Select ‘Settings’ from the menu. Under ‘Calls’, enable ‘Incoming call options’. Now, you can record incoming calls by pressing 4 on your keypad during the call. Limitations Of Using Google Voice While Google Voice is free, it has some limitations: Recording is only available for incoming calls. You must inform the other party before recording. Recordings are stored in the Google Voice app. The service is not available in all countries. Using External Devices Exploring the realm of recording phone calls on an iPhone without spending a penny often leads to using external devices. This method is perfect for users who prefer not to install third-party apps or use network services. Let’s dive into how you can harness the power of external gadgets to capture your conversations. Recording Calls With Another Smartphone Simple yet effective, this method requires a second smartphone with a voice recording feature. Follow these steps: Set up the secondary phone with its voice recorder app open and ready to record. Begin the call on your iPhone and turn on the speakerphone. Place the second device close enough to clearly record the conversation. Start recording and proceed with your call. Save the recording on the secondary device once the call ends. Utilizing Digital Voice Recorders Digital voice recorders offer a more professional approach to recording calls. These steps will guide you: Choose a digital voice recorder with ample storage and battery life. Connect the recorder to your iPhone using a compatible audio cable. Press the record

How to Know If Someone Blocked You on Iphone & Imessage
Blogs

How to Know If Someone Blocked You on iPhone & iMessage: Uncover the Truth!

How to Know If Someone Blocked You on iPhone & iMessage: Uncover the Truth!   To know if someone blocked you on iPhone or iMessage, check for delivery notifications and call rings. If iMessages don’t show ‘Delivered’ or calls go straight to voicemail, blocking is possible. Figuring out if someone has blocked you on your iPhone can be a subtle affair, as iOS doesn’t notify you when you’ve been blocked. When you send an iMessage to a contact that has blocked you, the message will appear to send as usual but you won’t see a delivery confirmation. Phone calls are another indicator; if your calls consistently go directly to voicemail without ringing, it’s a sign that you might be blocked. Keep in mind, these behaviors can also occur due to technical issues, so they’re not definitive proof of being blocked. Nonetheless, if you notice a persistent lack of response across multiple communication channels, it’s a strong hint that the user may have blocked you. Credit: www.idownloadblog.com Signs Someone May Have Blocked You Understanding if someone has blocked you on an iPhone or iMessage isn’t always straightforward. However, certain signs might hint at it. Below, we explore these signs in detail. Call Attempts Go Straight To Voicemail If your calls never ring and always divert to voicemail, consider this a potential sign. This can happen when the other person has blocked your number. Normally, you might hear at least a few rings before being redirected. Continuous direct transfers to voicemail could mean you are blocked. Texts Don’t Show ‘delivered’ Status Another clear indicator is the absence of the ‘Delivered’ status on your iMessages. Normally, messages you send will show a ‘Delivered’ or ‘Read’ status beneath them once they reach the recipient. If your messages consistently show neither, the recipient may have blocked you. Keep an eye on these signs to understand your communication status on iPhone and iMessage. This will help you determine if you might be blocked. Credit: www.iphonelife.com Testing The Waters With Imessage Curious about whether someone has blocked you on their iPhone? One of the simplest ways to find out is by using iMessage. This messaging service has built-in features that can hint at whether you’ve been blocked. Here’s how to test the waters. Color Of The Sent Messages Start by observing the color of the text bubbles in iMessage. Here’s what each color means: Blue bubbles – Your message was sent via iMessage. Green bubbles – Your message was sent as a regular text message. If you always communicated in blue and suddenly messages turn green, it might be a clue. A green bubble could indicate that the person has blocked you, or they are not connected to iMessage at the moment. Imessage Delivery Notifications Another sign to look for is the delivery status of your iMessages. Here’s what to check: Send an iMessage to the contact in question. Watch for a “Delivered” or “Read” confirmation below the message. If you don’t see any delivery notification, it could mean your message hasn’t reached them. This is a common sign that you might have been blocked, especially if the delivery notifications used to appear before. Analyzing Call Patterns Analyzing call patterns can reveal if someone has possibly blocked your number on their iPhone or iMessage. Observing how calls behave when you dial a contact can provide clues about your call status. Look out for these tell-tale signs. Ring Duration Before Voicemail A key indicator to notice is the ring duration before voicemail. Usually, when a call is not blocked, the ringtone goes on for a few cycles before diverting to voicemail. However, if the call goes to voicemail after just one ring—or even half a ring—it might mean you’ve been blocked. Here’s what to watch for: Normal Ring Duration: Typically around 20-30 seconds (4-6 rings) Possible Blocked Duration: Usually less than 5 seconds (1 ring) No Callback After Multiple Calls Another sign is no callback after multiple calls. If you’ve called several times over days or weeks and never received a callback, this could be a red flag. Especially if the person used to return your calls promptly, a sudden stop might indicate a block. Keep track of: Call Attempt Callback Received First Call No Callback Subsequent Calls Still No Callback The Facetime Clue Wondering if someone blocked you on your iPhone or iMessage? Facetime reveals secrets without a word. Look for these signs to uncover the truth. Unavailable Facetime Calls Facetime won’t connect when someone might have blocked you. Here’s what happens: Immediate disconnection – Call ends abruptly. No ringing – Silence speaks volumes. Error message – A sign you’re possibly blocked. Facetime Rings Without Answer When Facetime rings but no one picks up, it’s puzzling. Understand these points: Endless ringing – Could mean you’re blocked. No engagement – The call never reaches them. Recurring pattern – Always rings out? It’s a clue. Checking The Contact’s Status Ever wondered if someone has blocked you on their iPhone or iMessage? It can be a little tricky to confirm, but a few signs can hint at it. Let’s explore how to check the contact’s status and get closer to the truth. Contact Details In Imessage One of the first places to look is the iMessage details. If a contact has blocked you, the interaction will change. Here’s what to check: Message Delivery: Sent iMessages that remain undelivered with no “Delivered” or “Read” status could be a clue. Sending SMS Instead: Your iPhone might send SMS texts (in green bubbles) instead of iMessages (in blue) if blocked. Profile Picture And Status Updates Another indicator involves profile pictures and status updates. Look for these signs: Profile Picture Status Updates If their profile picture no longer appears, it might be because they’ve blocked you. Missing status updates from the person’s contact card in iMessage could also suggest a block. Using Alternative Communication Methods Wondering if someone has blocked you on iPhone or iMessage? One effective strategy is to try alternative communication

How to Transfer Photos from Iphone to Computer—Pc Or Mac
Blogs

How to Transfer Photos from iPhone to PC/Mac: Quick & Easy!

How to Transfer Photos from iPhone to PC/Mac: Quick & Easy! To transfer photos from an iPhone to a computer (PC or Mac), use a USB cable or iCloud. On a Mac, the Photos app or Image Capture can be used, while on a PC, the Photos app or File Explorer works. Transferring photos from your iPhone to your computer not only clears storage on your device but also keeps your memories safe and accessible. Whether you’re a professional photographer looking to edit your work on a larger screen, or simply wanting to back up your vacation snaps, the process is straightforward and requires minimal technical knowledge. With today’s connectivity and cloud services like iCloud, bridging the gap between Apple’s iOS and other operating systems has never been easier, ensuring that your cherished photographs are just a few simple steps away from being on your computer. Follow these initial steps and say goodbye to storage woes, while keeping your photo library organized and up-to-date across all your devices. Why Transfer Photos From Iphone To Pc/mac Moving pictures from an iPhone to a computer is smart. Your iPhone storage gets full fast. Transferring keeps them safe. Use a PC or Mac to store memories. It’s easy and quick to do. Let’s explore why you should transfer photos. Freeing Up Space On Your Device More room for apps and music: Emptying your iPhone gives you space. Faster phone performance: A less cluttered iPhone works better. Update with ease: Big updates need space. Photos can take up lots of it. Safekeeping Memories Photos are precious. Computers are safer than phones. Phones can get lost or broken. A computer is a secure place to keep them. Computer hard drives are big. They can hold thousands of pictures. You can organize photos better on a computer. Backup is easier. You can save to an external drive too. Credit: support.apple.com Before You Start: Preparing Your Devices Transferring photos from your iPhone to a computer should be easy. It starts with device preparation. Let’s ensure a smooth transfer process. Updating Software Keep your devices up to date. This prevents transfer issues. Here’s how: On iPhone: Go to Settings > General > Software Update. On Mac: Click the Apple icon > About This Mac > Software Update. On PC: Go to Settings > Update & Security > Windows Update. Ensuring Compatible Hardware Compatibility avoids connection problems. Confirm the following: Device Requirement iPhone Functional USB Lightning cable Mac USB port or adapter if required PC Available USB port Check ports and cables before you start. Using The Photos App On Mac Transferring your cherished photos from your iPhone to your Mac should be a breeze. The Photos app offers a simple way to import your memories onto your computer. Let’s dive into the straightforward steps. Connecting Your Iphone Begin by connecting your iPhone to your Mac. You can do this using your charging cable. Once you plug it in, you might need to unlock your iPhone. A prompt may ask if you trust this computer. Simply tap ‘Trust’ to continue. Step Action 1 Use the iPhone USB cable. 2 Plug into your Mac. 3 Unlock your iPhone. 4 Tap ‘Trust’ on your iPhone. Importing Photos With your iPhone connected, open the Photos app on your Mac. You will see your device listed on the left. Click on your iPhone’s name to view the photos. At this point, you can select the photos you want to transfer. Open the Photos app on your Mac. Select your iPhone under ‘Devices’. Choose which photos to import. Click ‘Import Selected’ or ‘Import All New Photos’. After selecting, click the ‘Import Selected’ button for specific images or ‘Import All New Photos’ for a full transfer. Within moments, your photos will start transferring. Check your Mac’s Photos library to see them. The entire process is quick and efficient. Remember: Your Mac and iPhone should have the latest software updates. Photos will be found in the ‘Imports’ album or under ‘Photos’ tab. Disconnect your iPhone when the import is complete. That’s all there is to it! The Photos app on your Mac is a powerful tool to keep your precious memories safe and organized. Transferring Via Icloud Have lots of photos on your iPhone that you want to move to your computer? iCloud makes this process simple for both PC and Mac users. By using iCloud, your photos sync across all your devices, making transferring a breeze. Let’s get those photos onto your computer with easy-to-follow steps. Setting Up Icloud On Iphone First things first, enable iCloud Photo Library on your iPhone. This will upload your photos to iCloud. Here’s how to set it up: Open Settings on your iPhone. Tap on Your Name at the top, then iCloud. Select Photos. Toggle on iCloud Photos. Allow some time for your photos to upload to iCloud. The time needed depends on your internet speed and the number of photos. Accessing Icloud Photos On Mac On a Mac, viewing your iPhone photos is simple with iCloud. Follow these steps to access your iCloud photos: Click the Apple menu and select System Preferences. Choose iCloud. Sign in with your Apple ID. Check the box next to Photos. Open the Photos app. Your iCloud photos should now appear in the Photos app. You can download and organize them on your Mac. Remember to check your storage space on iCloud. You get 5GB for free but might need more for a large photo library. Leveraging Airdrop For Quick Transfers Are you ready to move photos from your iPhone to your computer with ease? AirDrop is a swift method for iOS users. Whether you have a PC or Mac, sharing memories takes only a few taps. This section will guide you through using AirDrop for quick and simple transfers. Enabling Airdrop On Devices To start, ensure that AirDrop is active on your devices. Follow these steps: Unlock your iPhone. Swipe down from the top-right corner to access the Control Center. Press

Iphone Alarm Volume Low? How to Make an Iphone Alarm Louder
Blogs

Iphone Alarm Volume Low? Boost It with These Tips!

Iphone Alarm Volume Low? Boost It with These Tips!   To increase iPhone alarm volume, adjust it in Settings under Sounds & Haptics. Ensure the Ringer and Alerts slider is moved to the right for maximum volume. Struggling with a too-soft iPhone alarm can be annoying, especially if it risks you oversleeping. The alarm volume on an iPhone is separate from the general volume, meaning you can keep your phone quiet while still having a loud wake-up call. Tailoring the alarm sound is straightforward: dive into your iPhone’s settings and make quick adjustments. The process is simple, offering an intuitive way to ensure your morning alarm is loud enough to stir you from slumber. It’s important to remember that the volume can be affected by various settings including the “Change with Buttons” option, which should be toggled off if you want to maintain a consistent alarm level. Empower your mornings by taking control of your iPhone alarm volume and never risk sleeping through an alarm again. The Silent Struggle: Low Iphone Alarm Volume Waking up on time can be a battle when an iPhone alarm whispers instead of shouts. Many rely on their iPhone to start the day, yet remain oblivious to a low volume issue that can lead to troubles beyond the bedroom. This post explores noiseless notifications and the steps to amplify them, ensuring mornings run on schedule. The Predicament Of Missed Alarms Imagine the frustration when an alarm fails to serve its purpose. It’s not just about waking up; it’s about keeping promises, attending meetings, and catching flights. A low-volume alarm can disrupt the entire day. Missed deadlines due to oversleeping. Being late for important events. Stress and anxiety from rushing to make up for lost time. Consequences Of Inadequate Alarm Volume The aftermath of a silent alarm resonates throughout the day. Missed alarms can lead to a domino effect of negative outcomes. Consequence Impact Professional Reputation Being tardy can question reliability. Personal Relationships Missed appointments can strain friendships. Mental Health Increased stress affects well-being. Recognizing the gravity of the issue is the first step. The next is to delve into effective solutions that guarantee your iPhone alarm volume is loud enough to rouse even the deepest sleeper. Initial Checks: Ensuring Your Iphone Is Ready To Alarm Missing an important wake-up call because your iPhone alarm volume is too low can start your day on a sour note. That’s why it’s crucial to make sure your iPhone is correctly set before relying on its alarm clock. Here are initial checks to ensure your iPhone alarm volume is loud enough to wake you up when you need it. Checking The Basics: Volume Settings Boldly navigate your iPhone’s settings to confirm your alarm volume is at its peak. Here’s a swift guide to pump up the volume: Open Settings and tap Sounds & Haptics. Drag the slider under Ringer and Alerts to the right for maximum volume. Ensure the Change with Buttons option is disabled to avoid accidental volume reductions. Is Do Not Disturb To Blame? Your iPhone’s Do Not Disturb feature might hush your alarm unknowingly. Double-check this setting for a loud and clear morning: Head to Settings and select Do Not Disturb. Verify if Do Not Disturb is activated— this might mute your alarm. Disable it or schedule it to ensure it does not overlap with your alarm time. Action Menu Toggle Adjust volume Sounds & Haptics Ringer and Alerts Check Do Not Disturb Settings Do Not Disturb Once these settings are correct, you can rest assured your iPhone alarm will sound off loudly to wake you without fail. Volume Woes: Common Causes For Low Alarm Sounds Waking up on time is important. Many people use their iPhone alarms for this. Sometimes the alarm volume is too low. This can be a big problem. Let’s find out why this happens. Software Glitches And Updates Software problems can cause low alarm volume. An iPhone might have a bug. Bugs can change settings without the user knowing. Updating the iOS can fix bugs. Always back up your iPhone first. Check your alarm after the update. Make sure the alarm volume is good. Hardware Issues: Speakers And More The iPhone’s speaker can be the problem. Dirt or damage can make the sound low. You should check the speaker. It is at the bottom of your iPhone. Make sure nothing blocks the sound. Try these steps: Clean the speaker gently with a soft brush. Play music to test the speaker sound. If the sound is still low, the speaker might need fixing. You can go to an Apple Store for help. They can fix it for you. Credit: support.apple.com Boosting Alarm Volume: Quick Fixes And Settings Adjustments Struggle with a low iPhone alarm volume can be a real drag, especially when it leads to oversleeping. Thankfully, there are several straightforward solutions to amplify that alarm and kickstart your day on a high note. Let’s dive into simple settings tweaks and pick louder tones to ensure your wake-up call is not only heard but is practically unmissable. Maximizing Volume In Settings To ensure you’re utilizing your iPhone’s full audio potential for alarms, head into the ‘Settings’ app. Perform these steps: Tap on ‘Sounds & Haptics’. Drag the ‘Ringer and Alerts’ slider all the way to the right. Enable ‘Change with Buttons’ to adjust the alarm volume with the physical volume buttons, if preferred. Remember: A higher ringer volume means a louder alarm. Ensure the phone isn’t on silent mode; otherwise, you might miss the alarm entirely. Selecting Louder Alarm Tones Choosing the right alarm tone is critical. Go for tones that are inherently louder and more abrupt, as they can be more effective in waking you up. To change your alarm tone: Open the ‘Clock’ app and tap the ‘Alarm’ tab. Tap ‘Edit’ and choose the alarm you wish to adjust. Tap on ‘Sound’ and preview different tones. Select a tone with a high pitch or an upbeat tempo, as they

Iphone Keeps Disconnecting from Wi-Fi?
Blogs

Iphone Keeps Disconnecting from Wi-Fi? Fix It Now!

Iphone Keeps Disconnecting from Wi-Fi? Fix It Now!   If your iPhone keeps disconnecting from Wi-Fi, it may be due to software issues or hardware malfunctions. Resetting network settings or updating the iOS can often resolve the problem. Wi-Fi connectivity is crucial for the seamless operation of your iPhone, providing access to the internet and various cloud services. A stable Wi-Fi connection allows for efficient app functioning, streaming of content, and timely updates. When your iPhone frequently disconnects from Wi-Fi, this disrupts your experience and can lead to frustration. Common causes include outdated firmware, network congestion, and interference from other wireless devices. Addressing these issues is essential for restoring a reliable Wi-Fi connection to your iPhone. Users experiencing this problem should first ensure that their device’s software is up to date and consider troubleshooting their network settings to maintain a consistent and dependable Wi-Fi connection. Introduction To Wi-fi Connectivity Issues On Iphones A seamless internet connection is deeply woven into the fabric of day-to-day life. iPhones are no exception, with users relying on a stable Wi-Fi signal for everything from casual browsing to managing important work tasks. Yet, a common and frustrating issue many iPhone users face is Wi-Fi connectivity that is inconsistent at best and unusable at worst. This section dives into why your iPhone might disconnect from Wi-Fi and how it affects your digital activities. The Common Annoyance Of Iphones Dropping Wi-fi Imagine you’re updating your favorite app, and suddenly, the progress bar freezes. The Wi-Fi icon vanishes! Your iPhone just dropped the connection. This irritating glitch can stem from outdated software, weak signals, or even hardware issues. Outdated iOS: Might lead to compatibility or performance hiccups. Router malfunctions: Can disrupt a steady connection. Network settings: Corrupted settings stir up connection faults. Physical damage: Can impair iPhone’s Wi-Fi reception capabilities. Impact On User Experience Unreliable Wi-Fi on an iPhone subtracts from the simplicity and effectiveness that Apple strives to deliver. Issue Impact Interruptions in Streaming Content stops, buffers, degrading leisure or learning experiences. Delayed Notifications Missed messages or updates lead to loss of real-time communication. Failed Uploads/Downloads Work or personal data transactions get affected, causing stress and delays. Credit: www.macworld.com Identifying The Problem Our trusty iPhones are essentials in our daily lives. They connect us to our world. But what happens when your iPhone keeps disconnecting from Wi-Fi? This section will help you identify if you’re facing this problem and what might be triggering it. Let’s troubleshoot together. Signs Your Iphone Is Dropping Wi-fi Several indicators can alert you to your iPhone losing its Wi-Fi connection. Recognizing these signs is the first step: Intermittent connection: Wi-Fi bars fluctuate, or you notice drops while using apps. Automatic switch to data: Your iPhone uses cellular data, even with Wi-Fi on. Repeated sign-in requests: Your device keeps asking for Wi-Fi passwords. Possible Triggers For Wi-fi Disconnection Understanding common causes is crucial. These triggers can often lead to disconnection: Trigger Impact Outdated software May contain bugs affecting connectivity. Wi-Fi Assist Switches to data when Wi-Fi is weak, leading to drops. Network settings Incorrect settings prevent a stable connection. Router issues Router malfunctions can disrupt service. Stay tuned as we explore solutions in our next segment. Initial Troubleshooting Steps Is your iPhone dropping Wi-Fi connection unpredictably? It can be a real hassle, especially when you need a stable internet connection. Before you consider hardware fixes or professional help, try these initial troubleshooting steps. Often, simple solutions can restore your Wi-Fi stability. Restarting Your Iphone And Router A quick restart often fixes temporary glitches. Turn off your iPhone and wait for a minute. Hold the power button to turn it back on. For your router, unplug it from power for about 30 seconds and plug it back in. This can refresh your network and clear minor software issues. Checking Wi-fi Network Stability Ensure the problem isn’t with the Wi-Fi network itself. Use other devices to check if the issue is specific to your iPhone. If other devices falter too, the Wi-Fi network could be at fault. Check your internet speed online and contact your ISP if you find inconsistencies. Inspecting Wi-fi Settings On Your Iphone Dealing with your iPhone’s Wi-Fi disconnecting can be a headache. You may miss important messages or be unable to stream your favorite show. Often, the solution lies within the Wi-Fi settings of your iPhone. Let’s explore how to inspect these settings and keep your iPhone connected seamlessly. Assessing Network Settings Start by taking a deep look into your iPhone’s Wi-Fi settings. Ensure Wi-Fi is turned on and your iPhone displays the correct network. Follow these steps to assess and troubleshoot: Open Settings on your iPhone. Tap on Wi-Fi. Check if Wi-Fi is enabled and your network is listed. If the network is not listed, ensure your router is on and within range. Forgetting And Reconnecting To The Network If your network appears but issues persist, try forgetting the network and reconnecting. This can resolve temporary connectivity glitches. Here is how: Within Wi-Fi settings, tap on the information icon (i) next to your network. Select Forget This Network. Confirm by tapping Forget. Search for your network again and re-enter the Wi-Fi password. By following these steps, you should restore a stable connection to your Wi-Fi. Remember to check for updates, as iOS patches can fix known connectivity issues. Keep your iPhone performing at its best with these simple Wi-Fi settings checks. Software-related Fixes Is your iPhone dropping Wi-Fi like it’s hot? Fear not, because often, the problem lies in the software. Before you wrap your phone in tin foil or perform a Wi-Fi ritual dance, try these software-related fixes. They’re often just what the tech doctor ordered to keep you connected. Updating Ios To The Latest Version Out-of-date iOS versions can lead to a buggy Wi-Fi connection. It’s like trying to fit a square peg into a round hole — sometimes things just won’t click until you update. Here’s how to give your iPhone the freshest iOS: Plug your

How to Recover Permanently Deleted Text Messages on Iphone (Ios 17)
Blogs

How to Recover Permanently Deleted Texts on iOS 17: Pro Tips

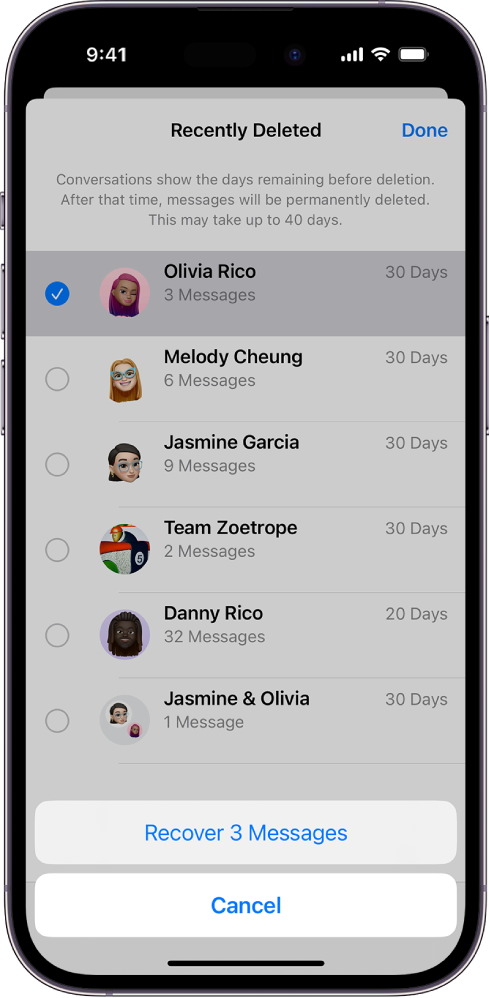
How to Recover Permanently Deleted Texts on iOS 17: Pro Tips   To recover permanently deleted text messages on iPhone (iOS 17), check iCloud or iTunes backups first. If unavailable, use a third-party recovery tool designed for iOS devices. Losing text messages can be frustrating, especially when they hold important information, memories, or serve as proof of conversations. With the advancement to iOS 17, iPhone users continue to look for reliable methods to retrieve messages that have been accidentally erased. Recovering deleted messages isn’t always straightforward; nevertheless, Apple provides a couple of built-in solutions to mitigate such losses. Users can resort to iCloud backups, which are set to occur automatically when the device is plugged in, locked, and connected to Wi-Fi. Alternatively, iTunes (or Finder on macOS Catalina and later) can serve as a safe haven for lost data if regular backups through a computer have been performed. In instances where these options fall short, a myriad of third-party recovery tools offer a beacon of hope. These tools often feature intuitive interfaces and can recover a range of data types, including texts. Implementing these strategies promptly enhances the chances of successful message recovery. Introduction To Recovery Tactics Welcome to the practical world of data recovery on iPhone! We’ve all been there, accidentally deleting an important text message and feeling that twinge of panic. But take a deep breath, because even when it feels like all is lost, your precious data might still be recoverable, especially with the latest advancements presented in iOS 17. The Challenge Of Data Loss Permanently deleted text messages on an iPhone seem to vanish into thin air. The realization that these little digital packets of information are gone can bring both personal and professional challenges. You might lose heartfelt memories, crucial work details, or even verification codes needed for accessing online services. Identifying this problem is the first step toward finding a solution. Hope With Ios 17 Fortunately, the unveiling of iOS 17 has brought a ray of hope for iPhone users grappling with data loss. New features designed for data recovery provide users with tools to retrieve what once seemed irretrievably lost. With a few simple steps, users can now navigate their devices’ in-built recovery features or embrace the power of iCloud to bring their cherished messages back to life. Introduction to Recovery Tactics: Mastering the methods for data recovery is crucial. Those inadvertently deleted texts could be within reach using the right approach. Users must understand the tools at their disposal and know how to maximize their chances for a successful recovery. Recovery requires a blend of: Knowledge of iOS functionalities: Knowing how your device manages data is key. Familiarity with iCloud backups: iCloud may have a snapshot of your data. Utilization of third-party software: Special tools can aid in data retrieval. Each of these recovery strategies is potent, but knowing when and how to use them is pivotal. Below, we’ll dive into the step-by-step methods to recover permanently deleted text messages on an iPhone running the latest iOS 17, exploring the nuances of the robust features that make recovery a tangible reality. Before You Start: Preparation Steps Lost text messages on an iPhone can feel like a big setback. Don’t worry! There could be a way to get them back. With iOS 17, restoring deleted texts might be simpler than you think. Start with some basic steps before diving into the recovery process on your iPhone. Check Your Last Backup Last backups are key to recovering messages. Before trying anything else, do this: Open Settings on your iPhone. Tap on your Apple ID. Choose iCloud > iCloud Backup. Check the date of your last backup. If the backup date is before deleting your texts, you’re in luck. Understand Ios 17’s Recovery Features iOS 17 comes with built-in recovery options. These steps will help: Get familiar with Recently Deleted under Messages. Learn about Recover from iCloud. Using Ios 17’s Built-in Recovery Think your deleted text messages are gone for good? iOS 17 might have a trick up its sleeve. The new built-in recovery can be a lifesaver. Here’s how to bring those texts back to life. Accessing The Recently Deleted Folder Lost a text? Don’t panic. iOS 17 keeps deleted messages for a bit before they disappear. Follow these steps to check the ‘Recently Deleted’ folder: Open the Messages app. Tap ‘Edit’ on the top left corner. Choose ‘Show Recently Deleted’. Here you’ll find texts that aren’t quite gone yet. Select the ones you need back. Hit ‘Recover’ to bring them back to your main chat list. Remember, texts stay in ‘Recently Deleted’ for 30 days. After that, they’re hard to recover. Restoring Texts Via Icloud Sync iCloud keeps your texts safe too. If ‘Recently Deleted’ is empty, here’s what to do: Go to iPhone Settings. Tap your name at the top. Press ‘iCloud’. Ensure ‘Messages’ is on. This means they’re in iCloud. If your phone is set up right, old texts might sync back. Tip: If texts don’t appear, you might need to restore from an older iCloud backup. This erases your phone and puts back data from the chosen backup. Make sure this is what you want before you start. Credit: www.imobie.com Third-party Recovery Software Imagine you’ve just realized that an important text message is gone forever – or so you thought. The good news is that third-party recovery software can be a lifesaver. With the right tool, you may be able to get those lost messages back, even on the latest iOS 17. Choosing The Right Tool Selecting the correct software is crucial. Look for: Compatibility with iOS 17 Positive reviews from trusted tech websites A balance of ease of use and powerful features Customer support options in case you need help Step-by-step Recovery Process Follow these simple steps: Download and install the software onto your computer. Open the application and connect your iPhone using a USB cable. Select the ‘Recover from iOS Device’ option. Scan your iPhone for deleted

Scroll to Top