To resize an image on an iPhone, open the Photos app, select the image, tap “Edit,” then choose the crop tool. Adjust the image’s size by dragging the corners and hit “Done” to save changes.
Resizing images on an iPhone can be a quick task for those wanting to adjust their photos for social media, printing, or personal use. The process is built into the iPhone’s native Photos app, making it accessible without the need for additional software.
With the increasing use of visual content online, understanding how to manipulate image dimensions is a useful skill. This guide provides a straightforward method for anyone looking to customize their images directly from their device. The iPhone’s user-friendly interface ensures that even beginners can perform this task with ease, keeping their digital content looking sharp and professional.
Introduction To Image Resizing On Iphone
Resizing images on an iPhone is simple and efficient. Whether you need to adjust a photo for social media or manage storage space, the iPhone offers easy tools to change image size directly from your device.
Why Resize Images?
- Save space on your device.
- Make images fit specific requirements for social media or email.
- Speed up website loading times with smaller images.
Tools You Need
The iPhone comes equipped with all the tools you need to resize images:
- Photos app – Built-in app for easy access.
- Third-party apps – Additional features available.
Credit: www.businessinsider.com
Accessing Your Photos
Accessing your photos on an iPhone is the first step to resizing them. This process is quick and user-friendly. Let’s explore how to navigate the Photos app and select the image you want to resize.
Navigating The Photos App
Opening the Photos app is where your image resizing journey begins. The app icon looks like a multi-colored flower. Tap it to start.
- Tap the Photos app on your iPhone’s home screen.
- Scroll through your photo library or albums to find your pictures.
- Use the Search feature to find a specific photo quickly.
Once the app is open, you will see different views: Years, Months, Days, and All Photos. Choose the one that best helps you find your image.
Selecting The Image To Resize
After finding the right photo, the next step is to select it for resizing.
- Touch and hold the photo you wish to resize.
- Release to open the photo in full-screen.
- Tap the photo once to reveal options at the screen bottom.
With the image selected, you’re ready to adjust its size. The Photos app does not directly resize, but other methods are available. Keep following along to learn how.
Using Built-in Editing Features
Editing images directly on an iPhone is simple. The built-in editing features let you resize photos fast. No need for extra apps. Let’s dive into how to use these tools effectively.
Cropping For Quick Resizing
Open your photo and select ‘Edit’ in the top right corner. Use the corners to drag and crop your image. This method is perfect for trimming unwanted edges, focusing on a subject, or changing the composition.
- Tap ‘Edit’ on your photo
- Choose the crop tool at the bottom
- Drag the corners to resize
- Hit ‘Done’ to save changes
Aspect Ratio Adjustments
Maintaining an aspect ratio is key for platforms like Instagram or Facebook. Your iPhone makes it easy to adjust without distorting the image.
- Open the crop tool in your photo editor
- Tap the aspect ratio button on the top right
- Select a ratio like 16:9 or 1:1
- Move the photo within the frame to fit
- Press ‘Done’ to save your resized photo
Remember to save a copy if you wish to keep the original size. These simple steps ensure your images are perfect for sharing!
Third-party Apps For More Options
For iPhone users seeking advanced image resizing options, third-party apps are a treasure trove. They offer diverse features beyond the basics. Let’s explore the top apps and tips for a smooth experience.
Top App Recommendations
- Image Size – This app allows precise measurements and easy export options.
- Photo Resizer – Simple interface with quick resizing and editing tools.
- Resize for Story – Perfect for social media enthusiasts needing story-specific dimensions.
Download And Installation Tips
- Check app reviews and ratings before downloading.
- Ensure sufficient space on your iPhone to avoid installation issues.
- Follow on-screen instructions carefully during installation.
- Allow necessary permissions for the app to function properly.
Step-by-step Guide To Resizing With An App
Ready to share photos at the perfect size? iPhones make it easy with a variety of apps. This guide shows you how to resize images quickly and accurately. Let’s dive into the process.
Importing Your Photo
Start by selecting the right app. Open the app and tap ‘Import’ or ‘Gallery.’ Choose the photo you wish to resize. It will now appear ready for editing.
Customizing Dimensions
After importing, it’s time to adjust. Here’s how:
- Access the resize tool within the app.
- Enter your desired dimensions manually, or select a preset size.
- Check the preview to ensure your photo looks great.
- Save or export the newly sized image to your iPhone.
Credit: gooddogstrategies.com
Saving And Sharing Your Resized Images
Resizing images on your iPhone is a breeze, and sharing them should be just as simple. Once you have your image at the perfect size, you’ll want to save and share it with friends, family, or on social media. Let’s dive into how you can do that efficiently.
Exporting Options
Your iPhone gives you several ways to save and send your resized images.
- Save to Files: Keep a copy in iCloud Drive or on your device.
- Save to Photos: Add the image directly to your photo library.
- Use Share Sheet: Send via AirDrop, Messages, Mail, or social apps.
Choose the best option to fit your needs.
Image Quality Considerations
Quality matters when you save and share images.
| Format | Quality | Size |
|---|---|---|
| JPEG | High | Smaller |
| PNG | Higher | Larger |
| HEIF | Highest | Smallest |
Pick the right format to balance quality and file size.
Advanced Techniques
Advanced Techniques for resizing images on an iPhone can save time and streamline your photo management process. Whether you’re a professional photographer or someone who loves to share photos on social media, these tips will elevate your photo editing skills.
Batch Resizing Multiple Photos
Resizing photos one by one can be tedious. iPhones have a hidden power to resize multiple images with ease. This is ideal for quickly sharing photos online or saving storage space.
- Select your desired photos in the Photos app.
- Tap on the share icon and choose ‘Print’.
- Use a pinch-out gesture on a photo preview to turn it into a PDF.
- Save the PDF to Files and use a third-party app to extract and resize images.
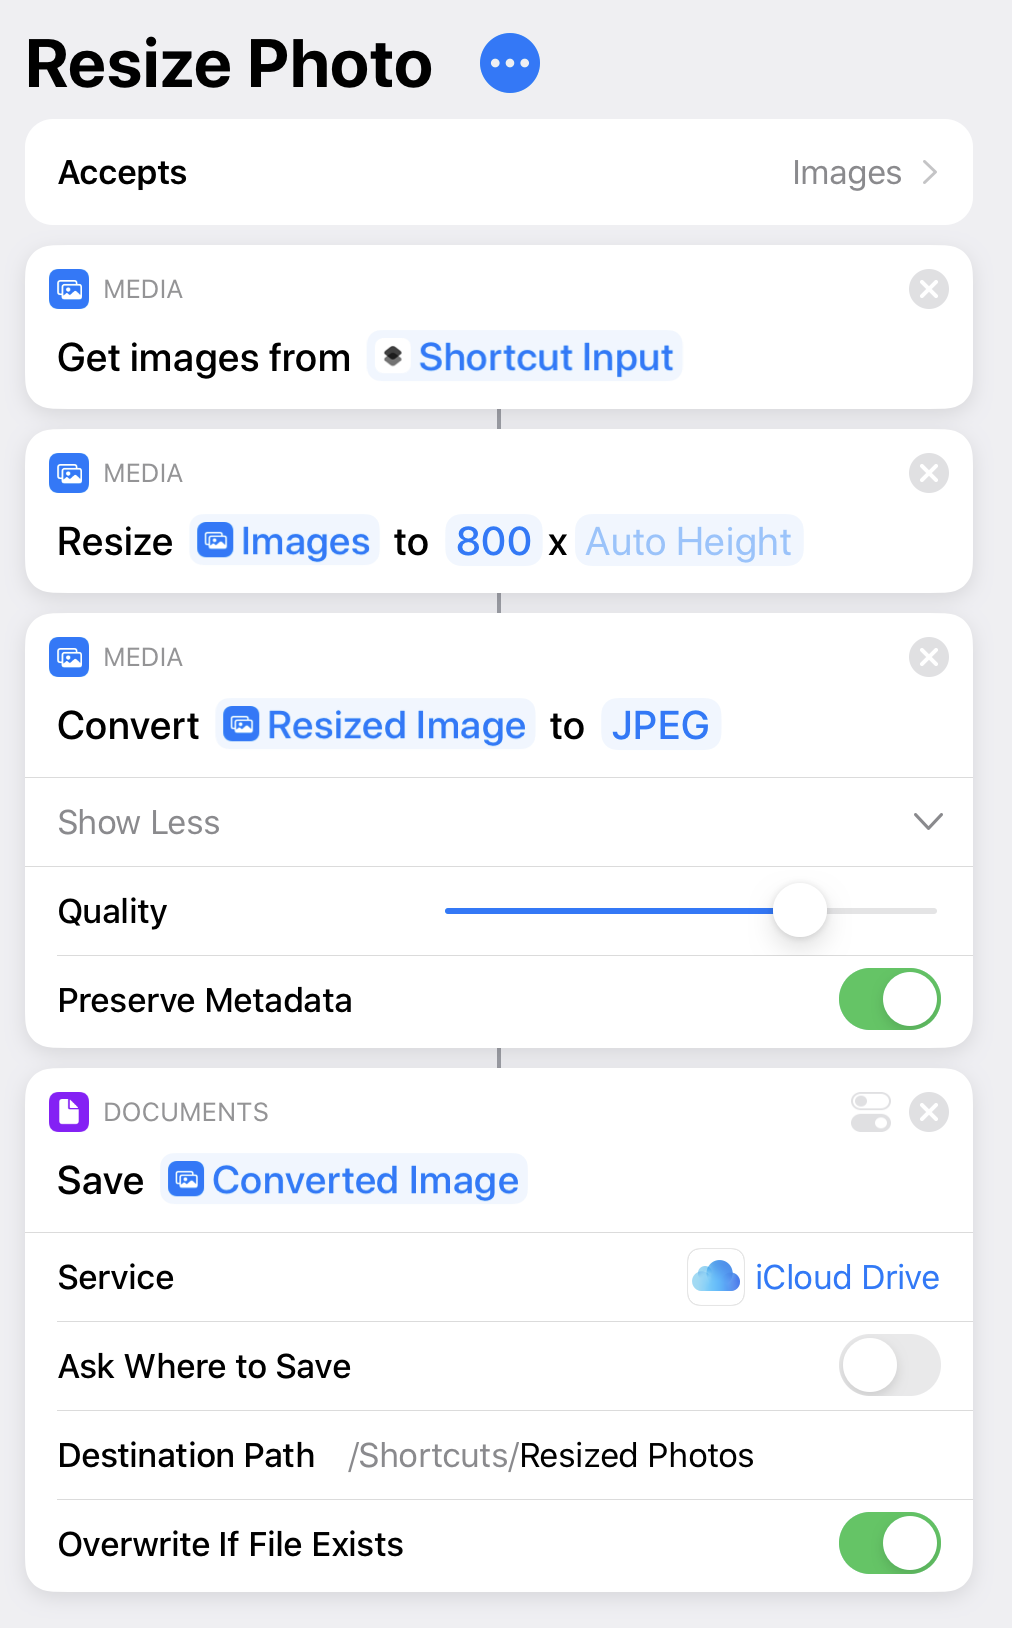
Using Shortcuts For Automation
The Shortcuts app on your iPhone allows for incredible automation. You can create or download a shortcut to resize images in a flash.
- Open the Shortcuts app and tap on ‘Create Shortcut’.
- Add actions to resize images to your preferred dimensions.
- Save the shortcut and add it to your Home Screen for quick access.
- Select photos, run the shortcut, and get resized images instantly.
Tip: Explore the Shortcuts Gallery for pre-made image resizing shortcuts created by the community.
Common Pitfalls To Avoid
Many iPhone users love sharing photos but resizing images can be tricky. Let’s discuss common pitfalls to avoid during this process. This ensures every photo looks its best.
Preserving Image Quality
When resizing an image, quality can suffer. Avoid these mistakes:
- Don’t over-compress: High compression reduces file size but harms image clarity.
- Choose correct tools: Use trusted apps that maintain quality during resizing.
- Back up originals: Always keep a copy of the original photo before making changes.
Aspect Ratio Mistakes
Getting the aspect ratio right is crucial. Wrong ratios can stretch or squash photos. Here’s how to avoid errors:
- Know standard ratios: Familiarize yourself with common aspect ratios like 4:3 or 16:9.
- Lock the aspect ratio: Use iPhone features to lock the ratio and prevent distortion.
- Use guides: Apps often provide grid lines. They help maintain proportions while cropping.
Credit: www.businessinsider.com
Frequently Asked Questions
Can You Resize A Photo On An Iphone?
Yes, you can resize a photo on an iPhone using the built-in Photos app or third-party apps available from the App Store.
How Do I Resize An Image In Photos?
To resize an image in Photos, open the app and select your image. Click on the “Edit” button, then choose the “Crop” tool. Here, you can adjust the image size by dragging the corners. Save your changes once done.
How Do You Reduce The Mb Size Of A Photo?
To reduce the MB size of a photo, use an image compressor tool online. Alternatively, adjust the resolution and format settings in an image editing software. This can significantly decrease the file size without losing quality.
How To Use Resize Image Shortcut On Iphone?
To resize an image on iPhone, open the Photos app, select the image, tap “Edit,” then choose the “Crop” tool to adjust size. Save your changes.
Conclusion
Resizing images on your iPhone is a breeze with the right tools and techniques. Whether you’re adjusting for social media or personal use, the steps outlined in this guide ensure quick, hassle-free editing. Embrace these simple methods to refine your photos, enhancing their impact and suitability for any digital space.
Ready, set, resize!